Shortcuts
Transferring assets to your Site, Project and Location
How to update the site name for my asset records?
You will need to use the transfer function to update the Site name where the asset is located.- To transfer assets to your Site
- Select either one or more assets in the asset search page
- Click on the ellipsis - “More Options”
 menu beside the asset or on the table header and select “Transfer”.
 - Click on the Company dropdown box and select your customer organisation.
- Select the “Customer” organisation
- Select the “Site”;
- Select the “Project”
- Select the “Location”
- Click on the “Yes” button to complete the transfer of asset(s).
Completing inspections or thorough-examinations inhouse
When customer present their assets for inspection, after undertaking a visual inspection and completing any repair, you can Click on the “Scan” button in the Table Navigation bar
- Scan all of the asset that have passed the inspection
- Ensure that Inspection Checklist are identical for all the assets;
- Click on the “More options”
 ellipsis on the header of the table and
 - Select “Inspection”
- You will need to complete the checklist attached to the assets to bring the assets into service/ fit for use.
- If there is no inspection checklist associated with the assets, the default/interim inspection can be competed. In a default/interim inspection, you can now asset photos, attachments and comments
- The “Inspector” data cell associated with the asset is updated with the name of the person, completing the inspection. This allows a comprehensive Certificate of Conformity to be produced with the last inspected by name.
- Passed inspections can either be returned to “In-Service” or “Available” when stored on shelf at your warehouse.
Updating Inspection and Calibration Certificates from third parties
A third-party inspection is a service conducted by a competent party, authorised to undertake and sign-off as fit-for-purpose safety equipment. The EZYiD system allows you to record such inspections or calibration certificates for the respective asset. To record a third-party inspection or Calibration certificate:- Select either one or more assets in the asset search page
- Click on the ellipsis - “More Options”
 menu beside the asset or on the table header and select “Third-party inspection”
 - In the Third-party inspection details pop-up you can record the inspection completed by a third-party or record a Certificate issued by the third-party inspector.
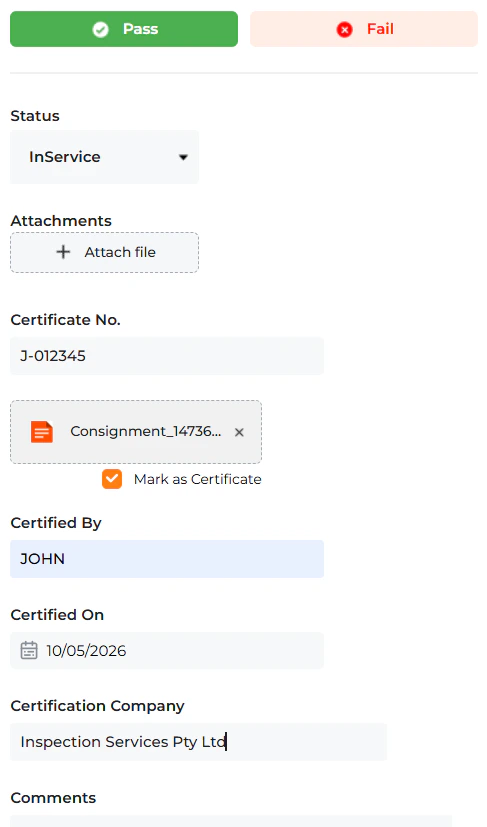
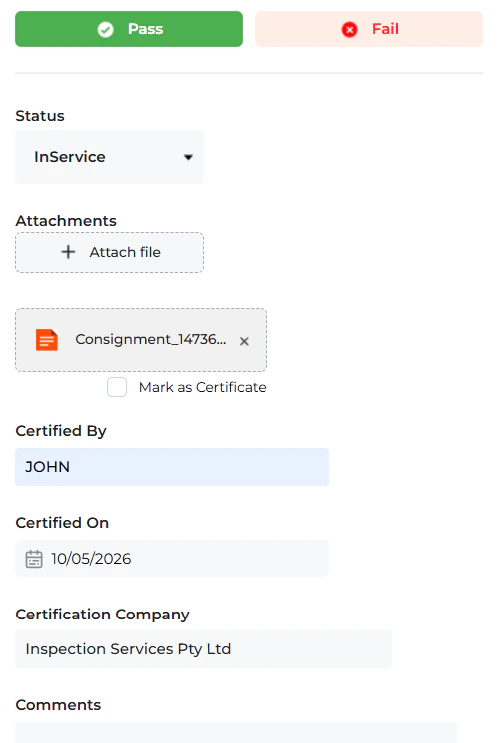
- Attach your Certificate (mandatory)
- If you certificate has a unique number (Cert #), Select the “Mark as Certificate” Checkbox
- Enter the Certificate no. (mandatory to record the cert # for calibration certs).
- Enter the name of the Inspector, in the “Certified by”
- Enter the date the inspection was completed in the “Certified on” text box
- Enter the name of the “Certification company”
- If the Inspection result was passed, you can either change the status as “Available” or “In-Service” to return the asset to service.
- Failed outcomes can either be “Quarantined or Retired”
- Pass or Fail as per the inspection report.
- Select “Submit” to complete**.**
Linking assets to your product catalogue
When you bulk upload asset records from your spreadsheet and need to update technical documentation or standards, you could either do a bulk update (Refer how to “Bulk Update” records), or link your assets to an existing product catalogue record. To link your assets to an existing product catalogue, your assets must:- Have an identical part/model number
- Manufacturer name
- Select either one or more assets in the asset search page
- Click on the ellipsis - “More Options”
 menu beside the asset or on the table header and Click on the “Link to Product” shortcut
 - The system will automatically filter the products that fit your criteria above
- Select the most appropriate product in the “Link to product” window
- Click on the “Update” button to update your assets.
Unlinking assets to products
In case you make a mistake and link your asset(s) to an incorrect product, you can break the link. To unlink your assets from an existing product:- Select the assets in the asset search page
- Click on the ellipsis - “More Options”
 menu beside the asset or on the table header and
 - Click on the “Unlink to Product” shortcut.
- Use the Bulk Update (Refer how to “Bulk Update” records) to correct any data mistake, if necessary.
Update location
The EZYiD system allows you to pin one or more assets to a geolocation/latitude/longitude on your map interface. To update the location of an asset on the map interface:
- Select either one or more assets in the asset search page
- Click on the ellipsis - “More Options”
 menu beside the asset or on the table header and Click on the “Update Location” shortcut
 - In the “Select Location” window search box, enter the address and click on the
 icon to locate the address.
 - If you wish to pin the address to your current location, Click on the “Locate me” button
- You can zoom to the preferred elevation or update the location pin on the map and Click on “Update” to save the lat/long attributes of the asset(s).
Update usage or Installed version data
If your asset useful life unit is based on its usage, EZYiD allows you to update the usage of the assets manually. You cannot update the usage count by editing the asset record.- Select either one or more assets in the asset search page
- Click on the ellipsis - “More Options”
 menu beside the asset or on the table header and Click on the “Usage Count/Version” shortcut
 - Enter the number of uses in the Usage Count text box. This number is additive to the uses already registered against this asset(s)
- Click on the “Submit” button to save.
- When the “Usage count” exceeds the “Service Life Limit”, the asset(s) will be marked as “Expired” with the icon
- When the “Version” no installed is less than the Minimum supported version, the asset(s) will be marked as “Expired” with the expired icon
Updating Custodianship of assets (Loans and Returns) – Next release
The EZYiD system allows you to record and track assets/tools/PPE issued to employees and contractors. Checkout and Check-in events are now recorded in the asset history table, providing a complete history of the asset. To update the custodian details against an asset(s):- Select either one or more assets in the asset search page
- Click on the ellipsis - “More Options”
 menu beside the asset or on the table header and Click on the “Loan” shortcut
 - Enter the name of the person in the Assign to text box or scan the RFID ACCESS CARD or select from the drop-down.
- A Name Tag is mandatory.
- Click on the “Assign” button to save.
- Scan in or select the assets in the asset search page
- Click on the ellipsis - “More Options”
 menu beside the asset or on the table header and Click on the “Return” shortcut
 - The Asset event history is updated with the return of the asset.
Copying your assets
If you want to duplicate or copy existing asset attributes, excluding the identity (serial#, EZYiD tag, Custiom ID and AssetID: NOTE: There is an update to this feature which will exclude compliance data columns in the copy. They include Site Name and Inspected by.- Click on the ellipsis - “More Options”
 menu beside the asset and Click on the “Duplicate” shortcut
 - Enter the number of new records/ assets you wish to create of the selected asset
- Click on “Yes” to confirm
- Follow the “Updating the Unique Identities of multiple assets” section to update the unique ids.
Delete your assets
To delete an asset(s) record permanently The Delete function is only available to Administrators. The administrator role is set in the people page of the user profile.- Select either one or more assets in the asset search page
- Click on the ellipsis - “More Options”
 menu beside the asset or on the table header and Click on the “Delete” shortcut
 - Click on “Yes” in the confirmation pop-up
Bulk update
The EZYiD Bulk Update function is a way to edit and update more than one asset record at the same time. Bulk update helps you save time by simultaneously editing and updating multiple but similar assets in your site. The key condition to undertake a bulk update and change the name of your asset, is that the asset must be unlinked from the product catalogue. Refer, How to unlink from product. You can update:- Asset Name
- Manufacturer
- Category
- Batch #
- Expiry date
- Workspace
- Inspection frequency and
- All additional info
- Select assets to update and click on the “More Options”

- Click on “Bulk Update”
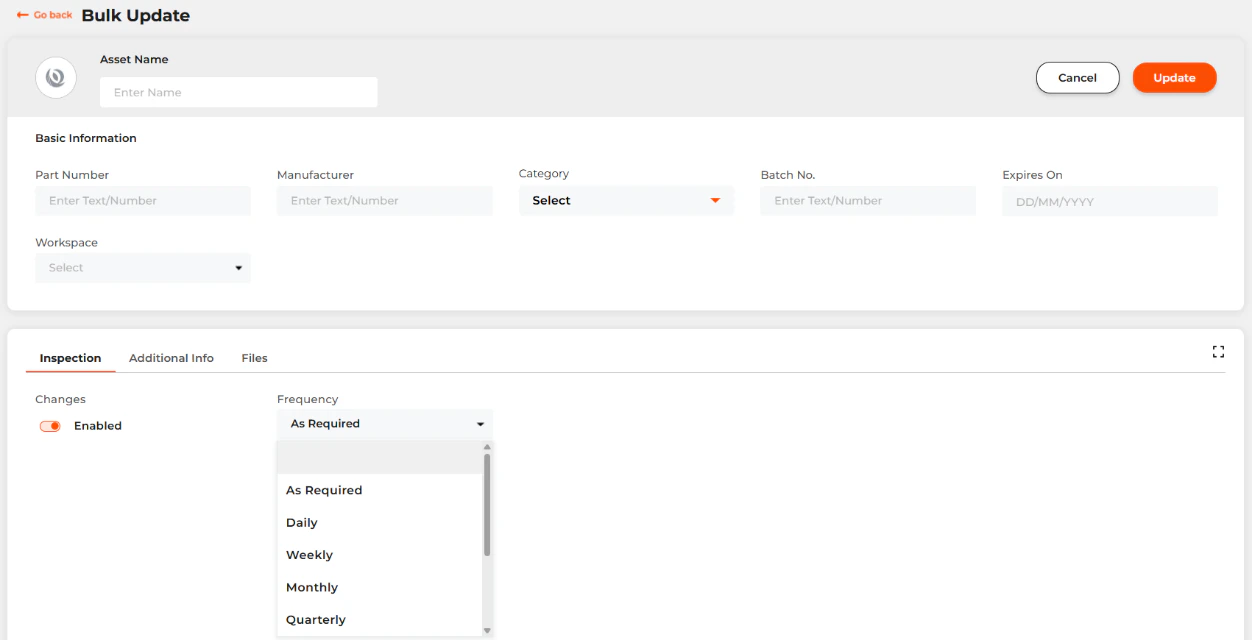
- Click on “Update” after you have updated the fields in the Bulk update page.
Adding assets to a Material order
- To add assets to an existing Material order,
- Select either one or more assets in the asset search page
- Click on the “Ellipsis / more option
 icon” menu beside the asset or on the table header and select “Add to Material order”
 - Select the Material order from the “Add to Material order” page.
- In case, you have not created a Material Order, you can create a new material order by
- Click on “New” to create a new material order,
- Other Click on “Update” after selecting the Material Order.
- Refer to “Creating and Updating a Material order” to update the rest of the Material order.
Missing Asset
You can now mark or tag your asset as missing or lost- Select your assets in your table and click on the table header shortcut.
- Select the “Missing” function to mark the assets as not found.
- When assets are marked as missing, the upcoming and overdue alerts are disabled
- To restore an asset into service, scan or select the asset and complete an inspection from the RHS shortcut options.
Maintenance
You can new record a maintenance or service event for an asset. Maintenance is a task that is generally associated with the service, repair and correction of defects recorded against an asset.- Select your assets in your table and click on the table header shortcut.
- Select the “Maintenance” function to update the maintenance task and the next service
- When maintenance is completed, the next maintenance or service date needs to be updated and is visible on the asset table
- The Spanner
 icon on the asset table is displayed when Maintenance is overdue.
 - To clear the alert, update the maintenance date as per your planned maintenance policy and booking.