How to add asset(s)
- On your Dashboard page
 Click on the “Create New” menu icon, and select “Asset” or
- Select “Assets” and “View” from the menu on the LHS and then click on button on the Navigation Bar of the Asset Table View page.
- On the “Create New Asset” page, you can create an asset by searching the product catalogue or create your own custom asset.
- You can also search by Categories by clicking on the
 burger menu beside the text box.
 - To create an asset from the Product Catalogue:
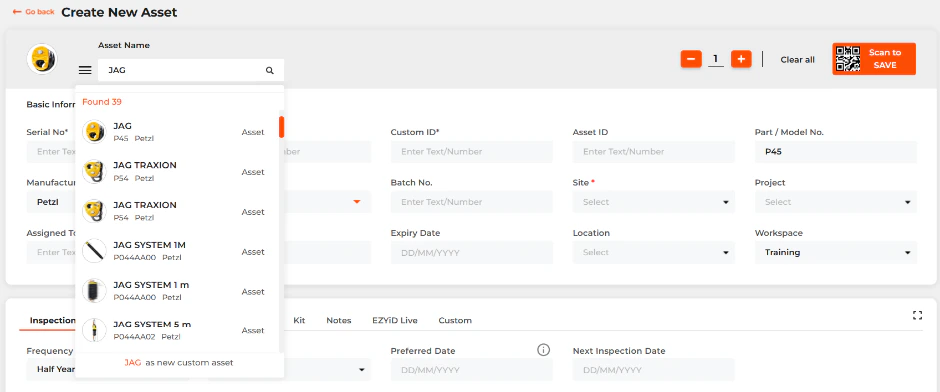
- In the Asset Name field, you can enter the name of the asset, the manufacturer or the part number to find your asset in the product catalogue.
- Select your product from the dropdown, and all properties will be updated
- If there is no product in your catalogue,
- Click on the link “asset name as a custom asset” or just update all fields to create the asset.
- Unique Identity – You must enter one unique identity for the asset
- Serial number from the manufacturer; or
- Custom identification for the asset created by your company; or
- Scan you EZYiD tag to update the EPC code in this field.
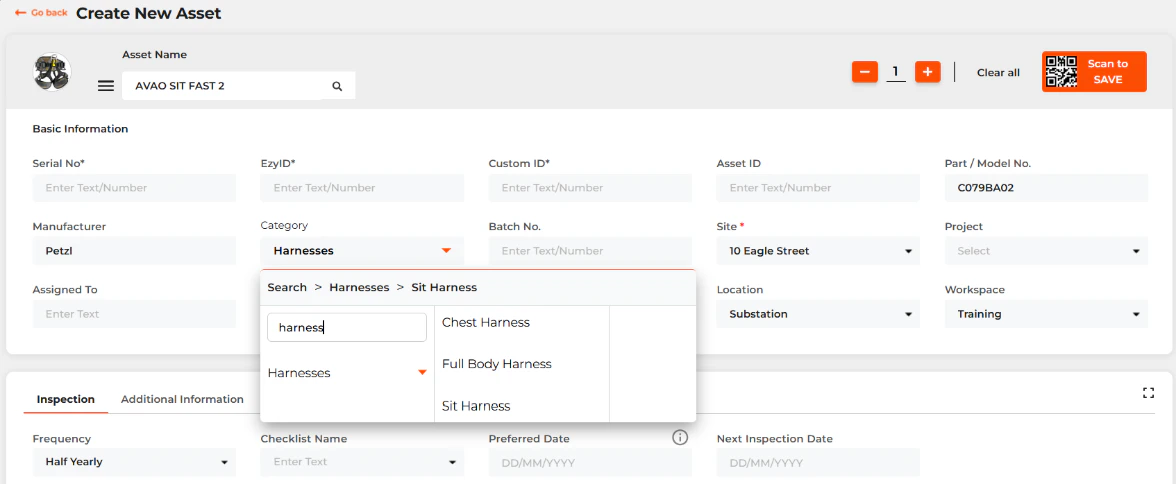
- Category – the group or class your asset belongs to. By default, the category is inherited from your product catalogue/ library. You can now edit/update the Category to your choice. When you click on the Category cell, you will be able to search and select from all active categories or sub-categories in the category reference table. Eg – Sub-category Sit Harness
- Physical location of your asset – Select the site from the dropdown. Your preferences allows you to set a “Default Site”. You can also select your projects, location and warehouse.
- Physical sites can also have project activities or locations, which is not mandatory when creating an asset. How to setup Sites, Projects and Locations for tracking of assets. You can also Select the Workspace your asset record is associated with.
- Future release will require the Workspace to be updated.
Inspection tab
By default, all assets created will have inspections enabled to Half Yearly for 6 monthly intervals.- To turn-off the inspection protocol, select “As-Required” in the Frequency dropdown.
Linking Safety Checklist (Instruction) to an asset
- By default, all assets with an inspection frequency are associated with a “Default checklist”
- Search or Select the Checklist you wish to link to the asset in the Checklist name dropdown box. If your checklist dropdown is empty, you will need to create or import a checklist in the checklist system.
Establishing the asset inspection interval
The Inspection system is designed to cater for most time intervals of our customers. Inspections can either be set for a preferred set date based on a periodic schedule or calculated from the actual last inspection date. To establish a frequency to a set calendar date- Select your inspection “Frequency” from the dropdown
- Enter your preferred inspection date in the “Preferred date” field for future inspections. Your next inspection is always calculated from the Preferred date, irrespective of when the actual inspection occurred. Custom frequencies cannot be set for preferred dates.
- Inspections completed within 7 days prior to the Preferred date will mark the inspection as completed. You can change this inspection interval window default of 7 days in your “My Company” page.
- Select your inspection “Frequency” from the dropdown (daily, weekly, monthly, quarterly, half yearly and yearly, biennially or custom for on a custom unit frequency)
- Select Custom as the Frequency to allow you to enter Interval and the Units (days, weeks, months and years).
Completing your Basic information
Assets created from the product catalogue would have pre-existing data inherited from the product. This includes the manufacturer, part number, category and the maximum usage count if applicable. Apart from the category, the data (properties) cannot be changed in the asset screen. Other fields that can be updated are:- Asset ID – the asset ID field is to provide you with the ability to associate the EZYiD asset with your ERP asset register.
- Batch Number – Supplier’s batch number for the product supplied.
- Category – allows you to link the asset to your custom category
- Expiry date – enter the date the asset expires on, which is the end of its useful life. Refer to Asset Useful life threshold configuration for automated alerts based on units or years.
- Manufacturer – Enter the name of the manufacturer
- Part number – enter the part number of the manufacturer.
- Category – select the appropriate category or sub-category from the dropdown menu. You can also create your own category for assets.
Additional information tab
- Click on the “Additional Info” tab and press enter
- Standard – enter the engineering standards associated with the asset
- Load Rating – enter the maximum load rating for the asset published by the manufacturer.
- Dimension – enter the dimensions of the asset published by the manufacturer.
- Service Life/Version – for assets with a unit based useful life, you can now set the Service Life limit and update the usage via the update usage/version count function. For assets with a minimum supported version requirement, you can record the minimum supported version and set the useful life type to version from the dropdown menu.
- Date of Manufacture – enter the date the asset was manufactured.
- Date of First use – enter the date the asset was commissioned for use.
- Purchase date – enter the date of the commercial invoice
- Supplier – enter the supplier name
- Purchase Order No. - enter the purchase order number
- Purchase Price – you can either allocate the cost price or a loaded price for material order costings
- Inspector – enter the user who completed the last inspection of the asset. The inspector name is now inherited from the Personnel table.
- Description – enter a general description of the asset
- Technical Info – enter the technical information and specification of the asset
Files tab
Asset documentation – in addition to the documentation inherited from the product catalogue, you can add your own documents for the assets.- Click on the “Files” tab
- Click on “Attach Files” to add documents and images
Kit tab
If you wish to group two or more assets, to allow you to transfer and inspect them as one, then the EZYiD kit management system is your solution. The structure of the EZYiD kit management system is based on a parent-child relationship hierarchy requiring the parent/master asset to be created first prior to adding the child assets to the kit. The EZYiD kit design is flexible enough to reflect most real-life requirements, where a kit can be part of another kit.- To add components to your kit, Click on the Kit tab and start scanning the EZYiD tag or enter the serial no or custom id in the text box.
- Refer to the “EZYID Kits” section for a more detailed explanation on custom and product kits and their inspection protocols.
- Select your inspection protocol as either “Kit level or Component level”. Kit level inspections allow the parent to control all components in the kit, whereas using component level, each component in the kit must be individually inspected to bring the kit into service. Refer to Kit Inspection Management for more information.
Custom Fields Tab
All Custom fields can be updated here. Custom fields can also be updated in the asset table. Refer to Custom Fields Management on how to create custom fields.Adding Multiple Assets of the same product
The Create New Asset page allows you to create multiple assets of the same product. To increase the number of assets, click on the + symbol to increase and the – symbol to decrease the asset count.
Saving your asset data
After completing your mandatory information, you can click on the “Save” button at the top of the page. All newly created assets are held in quarantine and must be inspected to be brought into service.Updating the Unique Identities of multiple assets
To update the unique identities of multiple assets, turn-on the “Edit” switch in the column headers in Table View. Your table view is filtered to the newly created asset records. Refer to the Table view edit functions section of this document. You can enter the unique identities either in the serial no, custom ID columns or scan the EZYiD electronic product code for each of your records in the EZYiD column. The system will validate the identity as they are entered. The Asset ID is not included in the Unique ID validation and will not be considered as a ID for the asset.The Inspection Experience
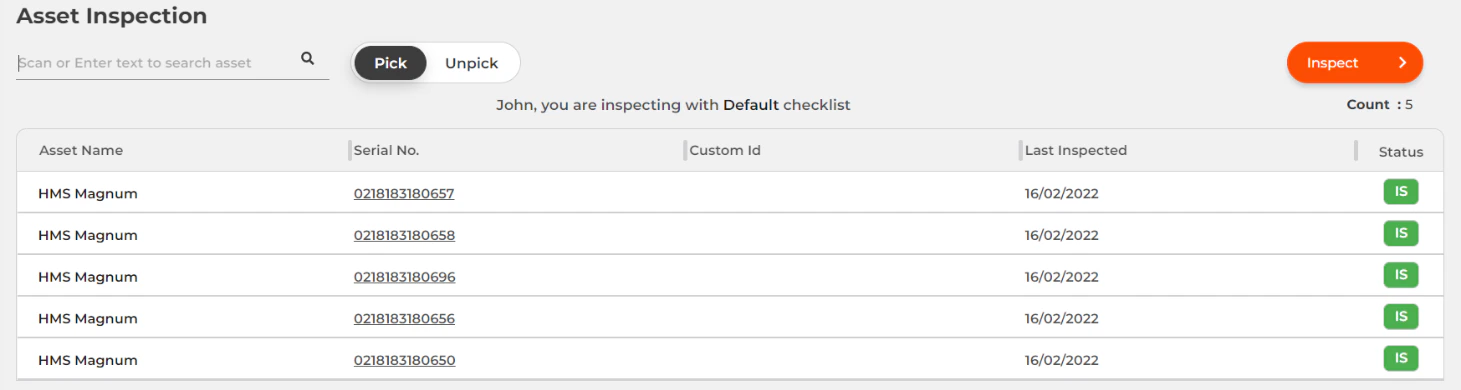
The Inspection user experience is designed to complete one function in the most efficient manner. You can scan your assets or enter the serial number or custom id to build your picklist.- Select “Inspect” from the Operations Menu on the LHS
- Start scanning your assets into the inspection list or enter the serial no or custom id.
- When complete, Click on the “Inspect” button at the top to complete the action.
- To remove assets from the pick list, click on the “Unpick” button and scan the assets that you wish to remove from the pick list.
The Transfer of Assets
Within the Operations menu, you can Inspect, Transfer and Checkout assets. Similar to the Inspection experience, the Transfer experience is designed to complete one function in the most efficient manner. You can scan or enter the serial number or custom id of your assets into the picklist and either transfer directly to a site or partner or add to a Material Order. To add records to a Material Order, you need to ensure that all assets are in the same site and the Material Order is created and saved. You can now create a new Material Order, if necessary. Refer to create your Material order. Quick Transfer
- Select “Transfer” from the Operations Menu on the LHS
- Start scanning your assets into the picklist
- When complete, click on the “Transfer” button to complete.
- Within you company you can transfer assets to other sites
- If you wish to transfer assets to the PGM Hut from the Firestation
- Select the PGM Hut Account
- Select PGM Hut site
- Click on “Transfer” to complete the transfer.

- Should all assets be in the same site, you will be able to add your records to a Material Order
- Should your records be across multiple sites, the “Add to Material Order” button will be disabled.
- To reconcile your physical assets to your current site, click on the “Transfer” button and complete transfer.
- After your records have been reconciled to your current site, click on the “Add to Material Order” to save your picklist.
- To remove records from the pick list, click on the “Unpick” button and scan the assets that you wish to remove from the pick list.
Analytics, Alerts & Reminders
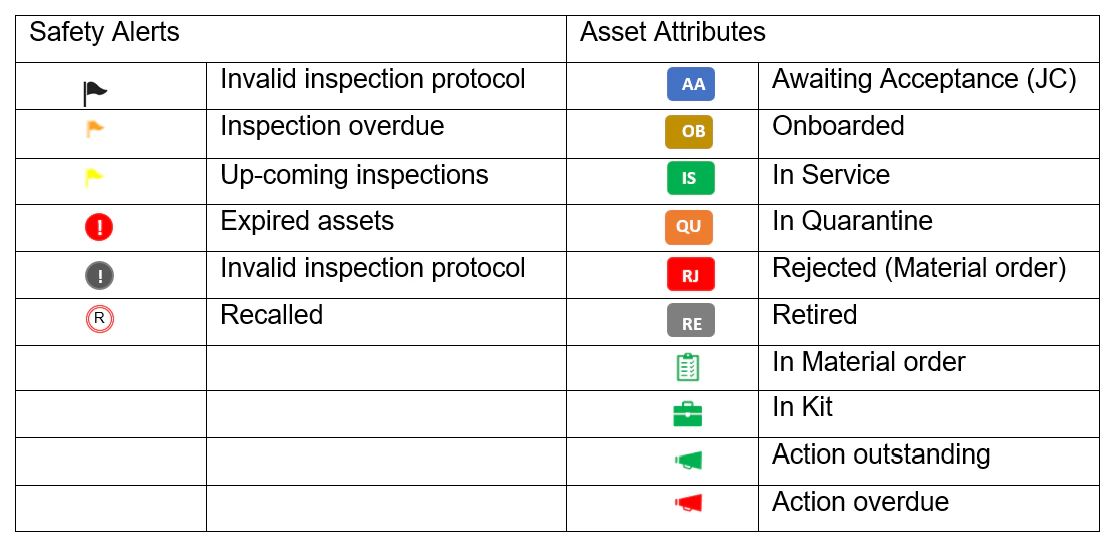
The EZYiD Advanced Search function includes an analytics engine to help you monitor, analyse and predict events in your organisation. You can analyse time series data on events, identify trends in asset movement, asset loss and safety behaviour in the field with respect to inspections, documentation, corrective and preventive actions. In addition, the analytics engine enables you to react to the actionable data to maintain a safe workplace. The configurable elements for your data analysis are the table views, the filters and the sorting of records. The Table view allows you to customise how and what information is displayed in a table. The Default table view. The EZYiD table is configured with a default table view. You cannot delete your default view but can add and move columns to personalise your default view. The only condition in a default view is that the Status column is always displayed on the RHS of the table.- Saving your table views
- All users are assigned a default view, the default view always has the line no, alert and asset name frozen to the LHS and the status column frozen to the RHS locked in the table.
- Frozen columns do not scroll similar to Microsoft Excel Freeze columns feature.
- To add or remove columns in your default table view, click on the “Hide columns” button to select and move the display order of your columns in the table view.
- To save the default table view, click on the “Saved views” icon in the table navigation bar to bring up the views dialog
- Select the Default view and click on “Update”
- Creating a custom view
- It is recommended that you save the view to a new name, prior to arranging your display columns.
- To save the view, click on “Save new view” at the bottom of the views dialog window and enter the name of the view in the text box.
- When the custom view is saved, it releases column rules associated with the default view. You are not allowed to hide your line no, alert and name for either default or custom views.
- You can show/hide any column to suit your specific user experience.
- You can move the status column from the RHS to the LHS. If you move the status column, by default it will display after the alert column on the LHS.
- After selecting your columns and display order, click on “Update” beside the custom view name.
- Once saved the view will be displayed in the list below.
- To select a different view, click on the views in the list.
- Your table view will always revert to the last view used.
- Deleting a custom view
- To delete a custom view, click on the view name and click on the “X” button beside the name.
Monitoring upcoming inspections for your customers
- As a EZYiD Manager, you can search for upcoming inspections within a date range.
- In your advanced search tab, select “Search by date”
- Select the “Next Inspection date” field
- Set your date range of choice and click on “Submit”.
Sending out reminders for upcoming inspections
- As a EZYiD Manager, you can send out reminders for actions to be undertaken on assets.
- Select the assets in your table view
- Click on the email symbol at the top of the page. An email will be sent to the asset inspector of the upcoming inspection.
Personalise your Asset Status Labels
- You can now change your asset status labels to suit your industry vernacular.
- To update your labels:
- Click on the “System Defaults”, in your RHS menu and select the “Asset Status” tab.
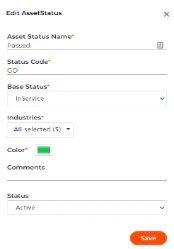
- Click on the “Add New Asset Status” and update the form with the Status label, Code, select the base state and the desired colour. You can also select the industries that you wish to apply the status label to.