
Material System for Warehouse Operations
The EZYiD Material system is designed to allow stores and warehouse operators manage inbound and outbound logistics. From managing requests from the field and customers, receipting or accepting new purchases from suppliers, mobilising orders to projects and demobilising inventory from sites on project closure. Material Request A Material Request is a manifest of categories and quantities required for an activity or project. A material request can be completed by a site supervisor, project manager or a contracts supervisor in preparation to mobilise for a contract or project. Material templates are an easy way to build a list of equipment for project or activity types. You can also save or update a completed material request manifest into a template for similar projects in the future. You can also apply or import a Material template and update quantities as required for the activity. Material Request templates are an efficient way to mobilise the right equipment and quantities, reducing any over-stock or under-stock situations. How to Create a Material Request Select “Material**, Requests”** from the LHS menu- Select the “Create New”
- Select your customer site from the dropdown
- Select the project
- Select the Requested by name from the dropdown
- Enter a Reference for a request
- Select the date the material is needed
- Add a PO or WO Number if available
- To update the Material line items, you can either import a template or update the manifest list
- Click on the Material cell and select the Category from the dropdown
- In the event that a category is not found, you can just enter a category name
- Enter the preferred manufacturer name
- Enter the Part or model no, if available
- Update the Quantity required for each Category
- When complete, Save Material Request
- When ready, Select the “Send” button to send request to warehouse for mobilisation
How to create a Material order
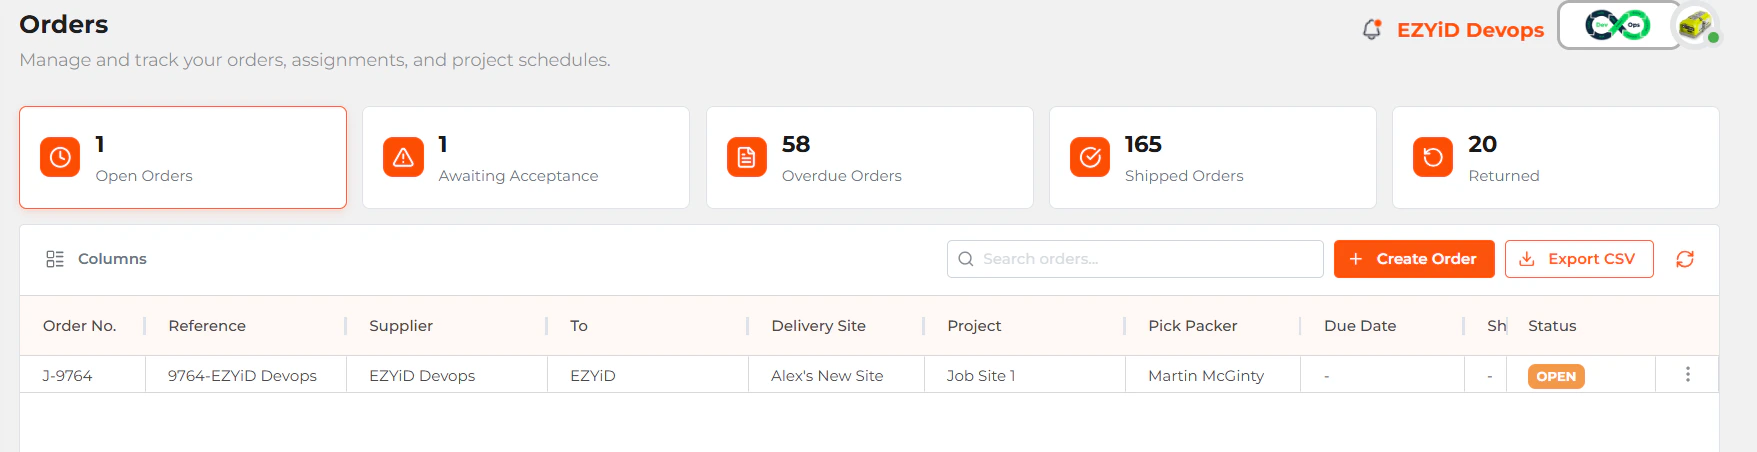
- Select Material, Orders from the LHS menu and you will be presented with the Material order dashboard page.
- Open Orders – orders created and waiting to be picked
- Awaiting acceptance – Shipped orders and consignments waiting to be accepted by the customer or site supervisor or requestor.
- Overdue orders – Open orders where the need by date has passed and incomplete
- Shipped orders – Orders shipped and accepted by customer or requested party
- Returned orders – Orders rejected by customer or demobilised to warehouse
- Click on the “Create order” button on the RHS of the material order page.
- On the “Material order” page, you can create a material order by entering the reference, proposed activity or a project ID or work order number.
- From the dropdown boxes, select the “Customer Site” where the assets need to be delivered.
- Select the “Project activity”, if available.
- Select the “Recipient or Requested by” name from the dropdown to receive and accept the Material order.
- Select the “Picker” name of the person from the dropdown assigned to pick and pack the Material order and
- Select the “Due Date” for the shipment
- Other fields include the PO or WO number if available
- Click on the “Create Order” button to save the Material order
Adding a Compliance inspection to the Material Order workflow
You can now automate a compliance inspection before you ship a material order to site. To enable a compliance inspection before shipping, you must complete the “Inspect before shipping” checkbox- To enable a compliance check before shipping
- Select the “Inspect before shipping” checkbox
- Click on the Create Order button
Picking a Material order
Material are usually assigned to a Store person for picking and Packing. Material Orders not picked and shipped by the Due date are moved to the Overdue queue. You can access a Material order assigned to you, either from the Dashboard page or from the Material order page by clicking on “Material orders” from the menu on the LHS.- Enter your name in the search text box and click on the
 icon to filter for requested Material orders assigned to you.
 - Open the Material order and commence adding or scanning in the asset to the Material order.
- By default, the Material order is set to pick mode, awaiting for you to scan the assets into the Material order.
- Make sure your cursor is in the “Scan” or enter EZYiD, Serial number or Custom ID” and commence scanning the assets into the Material order.
- Click on “Save Changes” to return to the Material order to add additional assets at a later date.
- To complete the Material order for transfer, click on the “Ship” button at the bottom.
Updating a Material Order from the Asset Table
- You can create a pick list of items to add to a Material Order
- You can either search or scan your assets to build a picklist
- Once your picklist is built, Click on the “Select all” checkbox of the Table header to select all of the row
- Select the “More Options” menu on the RHS and Select “Add to Material Order” from the menu
Removing assets from Material order
- Open the Material order
- Scan or enter the serial no or custom ID of the item in your search box
- Click on the bin icon, to remove the item from the manifest list
- Click on “Save Changes” to save the changes to the Material order.
Completing a Compliance Inspection or Audit prior to shipping
- When the inspect before ship checkbox is enabled, the Material Order workflow is changed to a Inspect button
- Select the “Inspect” button
- Select the general checklist from the dropdown
- Complete the checklist
- Click on the “Mark as Completed”
- On completion of your checklist, you will be returned to the Material Order
- Now your material order workflow will change to ship
- Select the Ship button to confirm shipment of the consignment
- You can also print a consignment report to attach to the consignment
Accepting assets via a Material order
To accept the receipt of assets into your site,- Click on the Material order dashboard
- Select the Awaiting Acceptance box and a list of Material awaiting acceptance will be listed
- Open the Material Order to review and accept
- Prior to accepting the Material order you can also download the Consignment report and validate receipt of the physical assets.
- Click on the “Accept” button to confirm receipt of assets into your site
- You can now record the name of the person accepting the consignment
- Record a signature
- Record the actual date the consignment was received. This is useful to backdate the receipt in the event the consignment was not accepted on the date it was received.
- New assets shipped in a Onboard state can be accepted into your required status, such as available, in-service or quarantine.
Rejecting assets in a Material order
- Click on the “Reject” button to return the asset in the Material order.
Deleting a Material order
In case you make a mistake, and you wish to delete the Material order,- Open the Material order dashboard and Click on the More Option on the RHS and Select “Delete”
Creating a Material order between sub chain partners
- Follow the usual steps to create a Material order
- In the “Company” dropdown menu, Select your “partner/member” company who you wish to transfer assets as part of a sale.
- Pick asset in a “Onboard” status
- Select Ship
Receipting equipment from Site
You can now receipt assets from site into your warehouse. Receipting of assets will update the Material Order manifest items as returned. This is useful when demobilising a site or project to analyse the quantity of assets lost on the job.- Select the “Material, Receipts” from the LHS menu
- In the Material Receipt page, Select your warehouse
- Scan in your assets
 Select the “Receipt” button to complete the transfer from site to warehouse.
Demobilise
Construction and maintenance projects can occur over months or years with assets shipped over a number of material orders. The Demobilise function allows the Site store to record the items sent or the warehouse to record all items received from the project. You can filter by a complete site, project, or one or more material orders by a reference ID to demobilise. Select the “Material, Demobilise” from the LHS menu
In your Demobilise page
Select the “Material, Demobilise” from the LHS menu
In your Demobilise page
- Select the Site or Warehouse you wish to demobilise to
- Using the filters you can find all material orders that you wish to demobilise
- When you select a Material Order, the asset manifest list associated with the material order is added to the mobilised list
- In the event a asset has already been receipted, transferred to another site or retired, they are automatically removed from the mobilised list to the Returned/ Closed list of the Demobilisation Page
- Scan the assets
- After you have scanned all assets, your Mobilised tab may contain a list of items or assets that have not been scanned.
- You have the option to “Mark the Assets as Missing”. You will not be able to Close out until the Mobilised tab is cleared.
- When the Mobilised tab is cleared, Select the “Closeout” button to close the Material Order(s).