
Inventory Register
The EZYiD Inventory register is a record of all assets and consumables grouped by category and the manufacturer’s part no. The Inventory register allows you to maintain stock levels across your warehouse, sites, projects and locations. When the Inventory system is accessed for the first time, you will be required to sync your existing asset records or create a new list in the inventory register. The Inventory register is where you create and manage your non-serialised items/ consumables. The key rules of the inventory system are:- Asset are never created in the inventory system
- You create your consumables in the inventory system
- Assets are created and onboarded via the existing Create Asset or Asset Table add shortcuts
- Assets are only added to the inventory register when an asset is accepted
- When an asset is accepted, the total QOH is increased, the quantity at Site, Location or Kit is updated automatically.
- When an asset is transferred from one site to another site, the QOH at the sender is reduced, while the QOH at the receiving site is increased
- When an asset is checked out, the QOH at the site/ warehouse is reduced
- When an asset is returned, the QOH at the site/warehouse is increased
 The inventory view table lists all inventory items, including assets and consumables in your register.
Select the “Add” button to create a new inventory consumable or non-serialised item
Select the “Receipt” button to record new consumable stock purchase
Select the “Upload” button to upload new consumables and quantities at respective sites.
The inventory view table lists all inventory items, including assets and consumables in your register.
Select the “Add” button to create a new inventory consumable or non-serialised item
Select the “Receipt” button to record new consumable stock purchase
Select the “Upload” button to upload new consumables and quantities at respective sites.
How to create a Consumable item
When you create an inventory item, you can import all attributes of a product from the public product catalogue. You can also change the category associated with the product, should you wish to use your own local categories
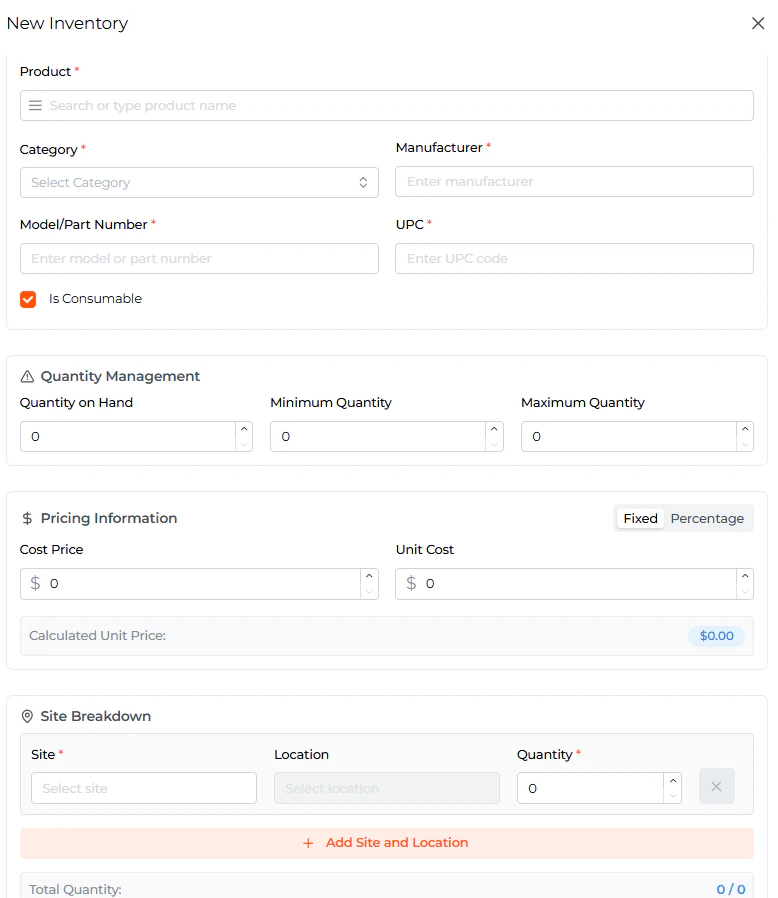
- Select the “Add” button
- Click on the Burger menu icon in the product search text box and search for your product or you can scan the partno/ barcode and search the catalogue. Select the product from the dropdown list
- Select your Category for the inventory item
- Enter the Part or model no
- Scan in the UPC code. In the event you do not have a UPC code, you can copy the partno to the UPC code as well. The part no and UPC code are mandatory fields.
- Enter the Quantity on hand, min and max levels for stock control alerts in the future.
- Enter the Cost price, Margin (percentage or fixed margin) to calculate the onboarded capital costs of the asset category.
- Allocate the Site breakdown, in case the inventory is spread across multiple sites and locations.
- Select “Save Inventory” to save your inventory
Viewing your inventory items
The primary grouping to your inventory register is the Category group. The Category group can have multiple subcategory groups. The secondary grouping is the manufacturers Name and Part number. The last grouping is the Site name. This grouping hierarchy enables queries like:- Show me how many chest harnesses we have at CS Energy.
- The response would be: 23 Chest harnesses (Chest Harness which is a sub-category of Harness) which is made up of 10xSkylotec, 10xPetzl and 3xFerno chest harnesses at CS Energy.
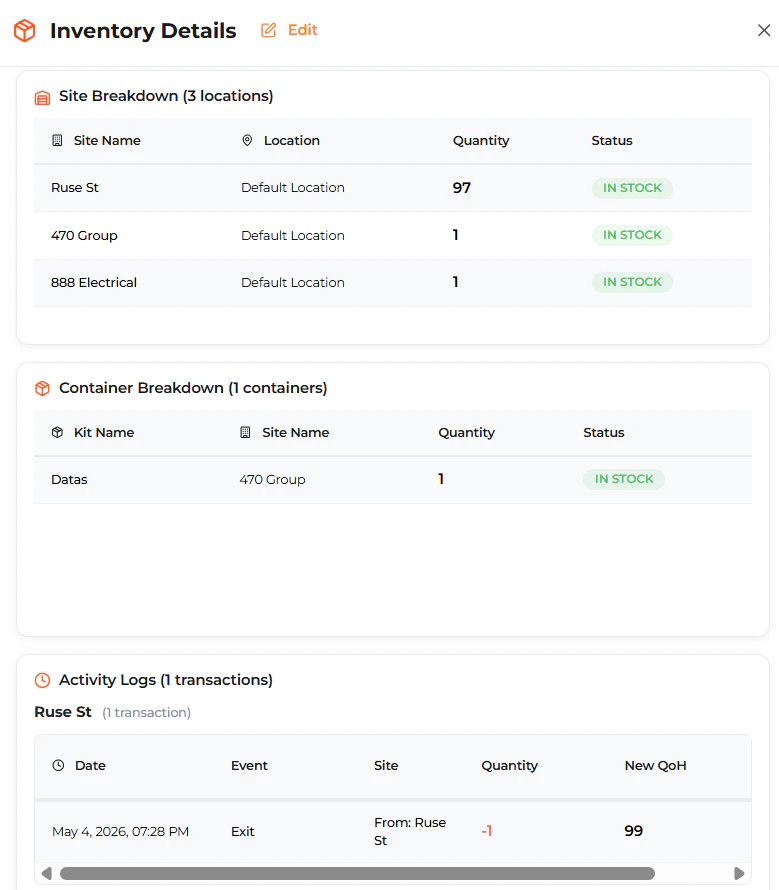
 You can click on the parent category to view the breakdown subcategory, manufacturer, site, kit and locations
- To open the detailed page of the inventory item and its stock movement history, click on the more options on the RHS of the inventory item.
How to upload new consumables (non-serialised items)
Uploading your opening stock The upload feature allows you to upload your opening stock and inventory controls when onboarding your consumables. The upload template (see below) allows you to create a new stock item, update the opening stock quantity, set the desired low and high levels and finally record the quantities to the respective sites. To upload your opening stock quantities:- Select the Inventory Register page
- Select the Upload button
- Upload your xls spreadsheet with the correcting heading as explained below
- Category Name – Category grouping for the product
- UPC Code – universal Product Code as per manufacturer barcode/packaging
- Part or model no – Manufacturers model number of the product
- Manufacturer Name – Manufacturer of the product
- Description – short description
- Price – Cost price
- Site – Site where is consumables are stored/allocated
- Quantity – Quantity on hand
- Min and Max stock levels for this product as per your consumption levels

Receipting New Stock
You can receipt new stock purchases to ensure you have the right Quantity-on-hand. To receipt new stock, Select the “Inventory, Receipt” function on the LHS main menu Select your Site, where the inventory item is received Scan the UPC code or part no to select the inventory item Repeat scanning of items or enter the quantity received Save to complete. When a consumable item is receipted, the quantity is increased for the stock item, at the site and location if updated.Stock Adjustments (New feature to be released)
Stock adjustment is a method to increase or reduce quantity on hand for an item category at a Site, location or kit. To start a stock adjustment, Select “Adjustment” in the inventory item view page. The inventory page quantity is not editable.- When your physical stock of an item is less than the system QoH, the adjustment type is “Decrease”
- Enter the number that you wish to reduce the stock by
- Select the Site, Project
- Select location
- Select Kit
- When your physical stock of an item is more than the system QoH, the adjustment type is “Increase”
- Enter the number that you wish to increase the stock by
- Select the Site, Project
- Select location
- Select Kit