Checklists
The Checklist system allows you to create a set of instructions for your users to follow and complete. The checklist is a controlled document owned and version controlled by your organisation. You can import global checklist and adopt into your document list. In future version, users can also adopt checklists as “My Checklist”- Log in to EZYiD asset management platform
- Select “Checklist” from the menu on the LHS and then click on the “New Checklist” button
- On the “Create Checklist” page, you have the option to create a new checklist from a Blank checklist or select an existing checklist from list and import into your organisation. Refer to “Choose a checklist from public library and customise it”
- Click on the “New Checklist” link
- Enter the name of the Checklist in the title text box
- Enter the description of the checklist
- Add a category to help find or group the checklist, if the category does not exist, you can create a new custom category.
- Click on “Create”
Adding Competencies to Checklist and Site restriction
Setting Site Restrictions
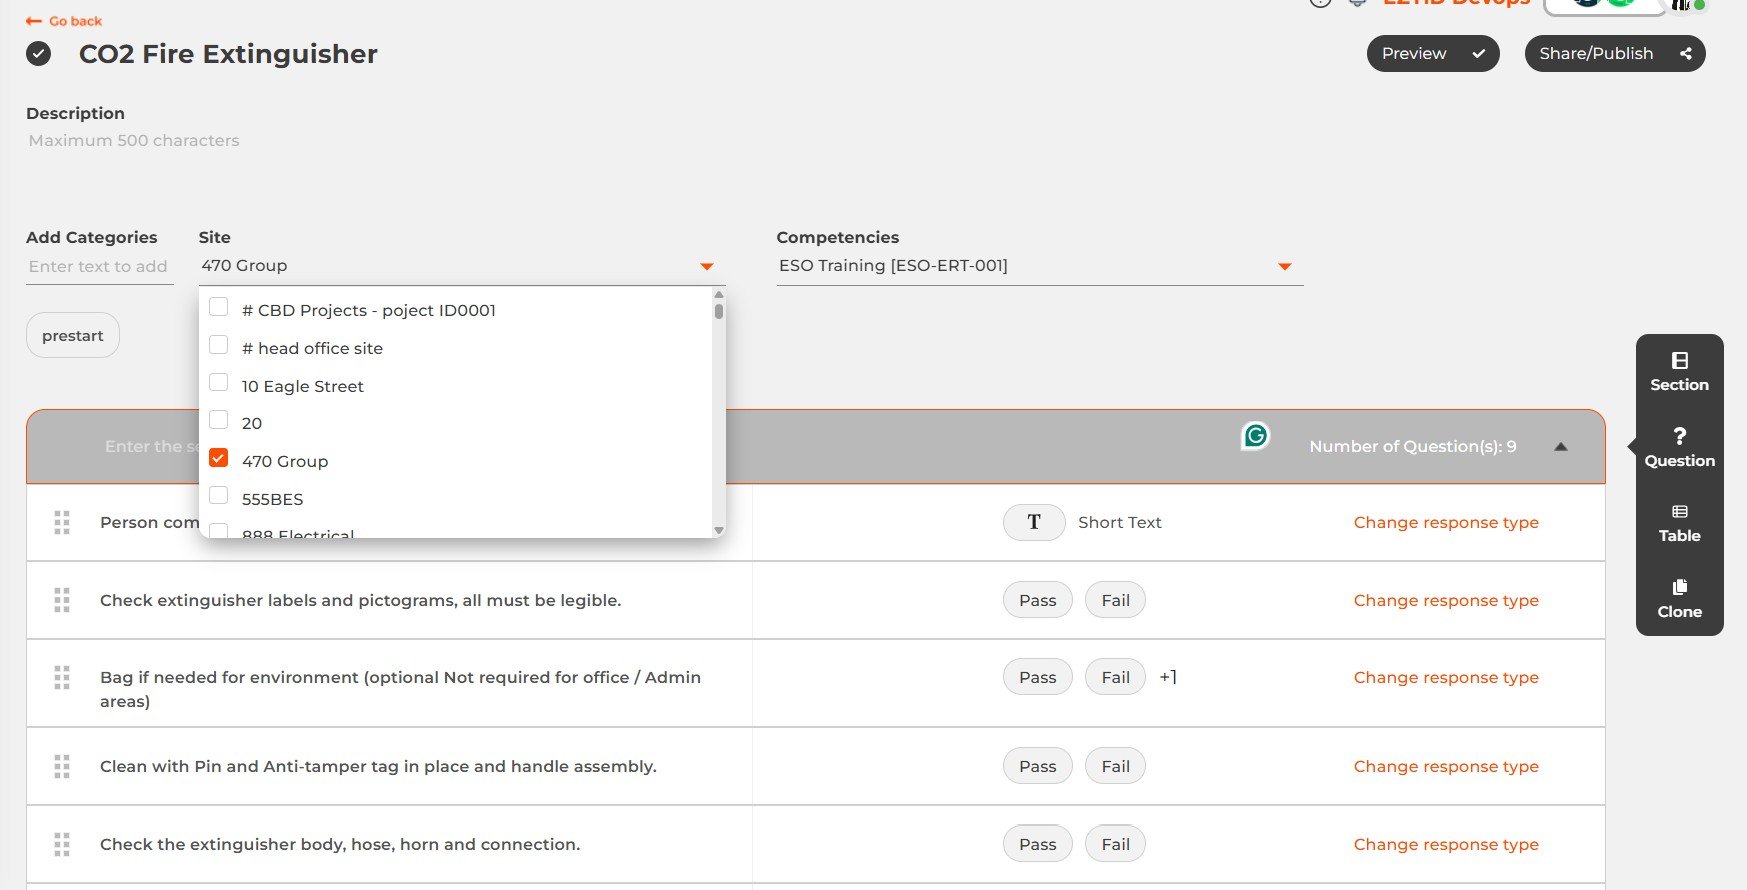
The Site field controls which site(s) this checklist is valid for. Steps:- Click the Site dropdown.
- A searchable, multi-select checklist of sites appears (e.g. # CBD Projects, # head office site, 10 Eagle Street, 20, 470 Group, 555BES, 888 Electrical, etc.).
- Tick the checkbox next to each site the checklist should be restricted to. Multiple sites can be selected.
- Selected sites are checked (shown in orange) — e.g. 470 Group in the example above.
- Click outside the dropdown to close it. Selected sites will typically appear as tags/labels above the field once closed.
- Leaving no site selected likely means the checklist is available across all sites — please confirm this default behaviour matches your intent before publishing.
- You can search within the dropdown by typing, since the site list can be long.
Setting Competency Requirements
The Competencies field controls which competency/qualification a user must hold to be assigned or to complete this checklist. Steps:- Click the Competencies dropdown.
- Select the required competency from the list (e.g. ESO Training [ESO-ERT-001]).
- Multiple competencies can likely be added if more than one is required — confirm whether this field supports multi-select in your instance.
- The competency code shown in brackets (e.g.
ESO-ERT-001) is the reference ID tied to your organisation’s training/competency register. - If a user does not hold the selected competency, confirm with your team whether the system:
- blocks them from selecting/starting the checklist, or
- allows access but flags a warning, or
- simply hides the checklist from their available list.
Checklist form editor
In the Checklist template/form editor, you can add one or more categories to be able to differentiate between thorough examination templates, interim/ prestart, maintenance and job safety questionnaire. To capture data from the field activity, you can build a set of questions to capture qualitative and quantitative data. To streamline the user experience, you may want to group your questions into sections if necessary. There is virtually no limit to what you can create with the Checklist Editor.- By default, a section and a question is created
- Click on the label “Enter the section title” and update the Section header
- Click on the label “Enter the question” and update the question
- All questions are created with a default attribute of Short text
- Click on “Section” on the RHS to create a new section
- Click on “Table” on the RHS to create a section with rows and columns
- Click on “Question” to start adding questions to your checklist
- Click on “Change Response type” to change the response attributes. Refer to “Adding logic to your response attributes” for a detailed description of all response types.
- To create your own multiple choice responses, refer to the “Creating your own multiple choice responses” section.
- To set minimum requirements for positive/pass multiple choice responses, refer to “Creating minimum requirement expressions for multi-choice responses”
- Repeat until all questions are entered, click on “Preview” to review the checklist.
- If satisfied, you can save and publish the checklist.
- You can save the checklist and publish as a private or public checklist.
- A private checklist is available to all users in your organisation
- A public checklist is available for all subscribers to import and adopt into their organisation.
- Saved checklist will not be visible until published.
Maintaining your checklist
- Click on the section and click on Clone to copy the section
- Click on Table to add a table section
- Click on the question and click on Clone to copy the question
- To copy a checklist, hover over the checklist and click on Clone to copy the checklist.
 To download a checklist, hover over the checklist and click on “Download PDF”
- You can now print the checklist, should you wish to do an offline inspection using the checklist.
Adding logic to your response attributes
- To add logic to the response attributes, you can click on the “Add logic” on the RHS menu
- You can add logic to multi-choice responses only.
- The logic that you can add is “if answer “is” or “is not” “Response A” or “Response B”
- Within the logic, you can add multiple question by click on the “Add question”
Status to your checklist sections
You now have the ability to track status of each section as they are completed. When completing a checklist, you can progressively monitor the outcome of any conditional logic in the section. The section header will display the pass or fail outcome depending on the conditional logic and responses to the questions in the section.Creating a table section
- Click on Table to create a new section
- Enter the number of rows and columns and click on Generate
- Update the column headers
Creating your own Multiple choice responses
- The multi choice function allows you to create your own custom response.
- As the name suggests, you can select multiple responses to a question.
- To create a multiple choice response, click on “Change response type” and click on the multiple choice tab.
- Click on “+Add new multiple choice response”
- Enter your responses
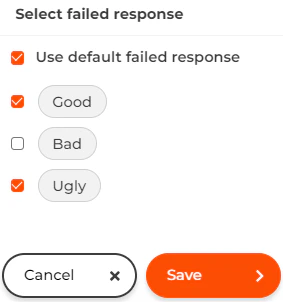
- Mark a fail response if necessary
- Save and select the responses for your question
- Select the “Multiple Selection” checkbox to enable multiple choice selection.
- Click on “Failed Responses” to select the failed responses in the choices that the user must select to fail the inspection.
- Similar to the failed response conditions, you can also select the “Positive Responses” that the user must select to pass the inspection. You can select either one or more choices of positive choices that the user may select to pass the inspection.
Creating minimum requirement expressions for multi-choice responses
You can now create minimum positive/pass response requirements for multi-choice selections.- After selecting your response types for your multichoice
- Check your Multiple Selection checkbox
- Check your “Positive responses” checkbox
- Check the “Minimum requirements” and the associated responses with the minimum requirements; and
- Click on Save.
Choose a checklist from public library and customize it
- Select a checklist in the “Create Checklist” page
- In the Preview page, Click on “Import & Edit”
- Follow the instruction of the “Checklist Form Editor” to modify and publish the checklist.
- Once published, the checklist is a controlled document in your organisation with complete version control and history.