> ## Documentation Index
> Fetch the complete documentation index at: https://help.ezyid.io/llms.txt
> Use this file to discover all available pages before exploring further.
# Account Configuration for Admins
> Setting up your company, workspaces, sites, projects, locations and categories is critical to create and maintain structure in your organisation moving forward.
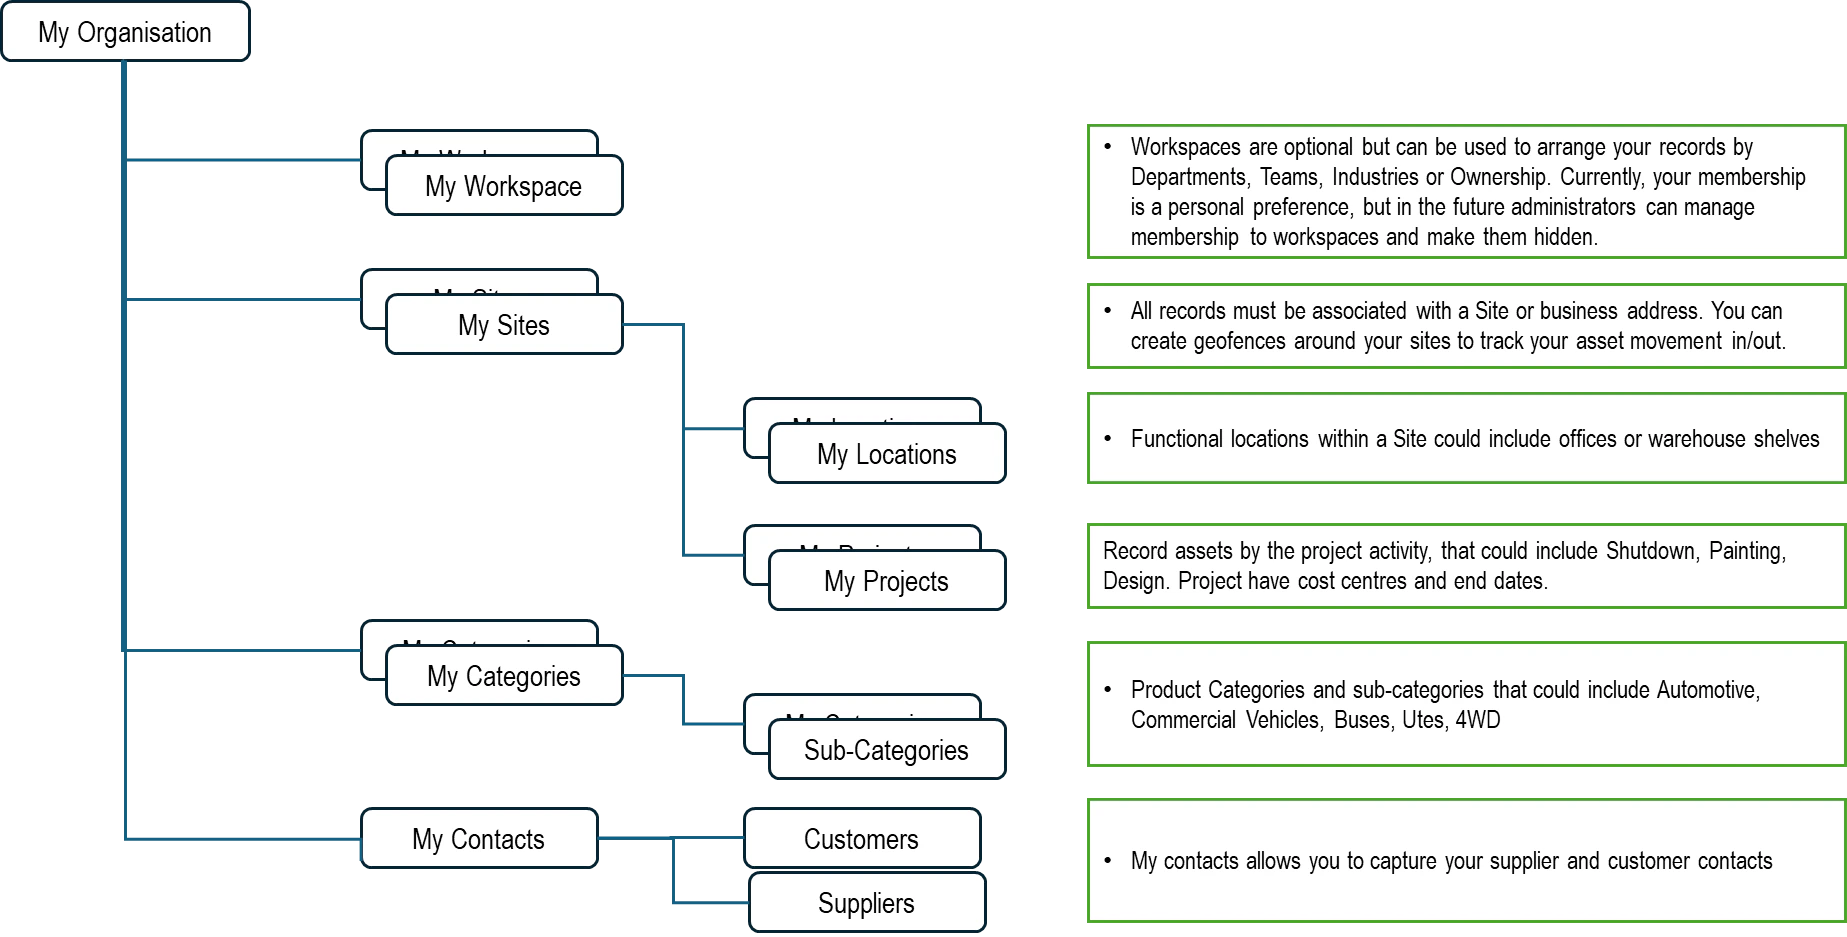
## Data Hierarchy within your EZYiD organization
EZYiD allows you to partition and organise your data (into meaningful ways), by regions, departments, teams or crews, sites, locations, projects and categories. This structure is key to easily manage all of your workflow under one organisation structure. In addition, partner connections allows you to connect and manage your customer and supplier data.
## Benefits of hierarchy
* Allows you to partition your data
* Provides a scalable structure for your work. You can expand your hierarchy at the top level as your business expands and grows.
* Roles based access to workspaces or sites
## Hierarchy Structure
 ## Workspaces
Workspaces are the highest level within the EZYiD hierarchy. All Sites, Projects, locations, categories and subcategories live within a Workspace.
While Workspaces are currently optional, selecting an industry catalogue will automatically create the Workspace in future releases. Selecting or enabling a Rope Access catalogue, will create a Rope Access Register workspace. Currently, your membership to a workspace is a personal preference, but in the future administrators can manage membership to workspaces and make them hidden.
## Creating a Workspace
* Click the orange icon, up the top right near the company name/logo.
* Click "System Defaults".
* At the top are multiple grey tabs, Click the tab "Workspace"
* All workspaces both active and inactive are shown.
* Click the "Add Workspace".
* In the Workspace create window, enter the Name of your workspace
* If required, enter the contact details of the person responsible for the workspace.
* "Industry Type" is a work In Progress and should not be selected at this time. This will limit the product catalogue in the Add Assets search.
* Select Save to save your newly created workspace.
## Editing your Workspace
In the Workspace list page
* Select the edit pencil associated with the workspace on the RHS
* Edit the Workspace name and contact details, if required
* Select the Save button to update the changes
Once the changes are saved, all associated references in the system will be updated.
## Deleting a Workspace
In the Workspace list page
* Select the bin icon on the RHS of the respective Workspace
* Select the OK confirmation button
* Note – If there is any linkage of the Workspace to an asset record, you will be prevented from deleting the Workspace.
## System Navigation and Definitions
## Dashboard screen navigation
## Workspaces
Workspaces are the highest level within the EZYiD hierarchy. All Sites, Projects, locations, categories and subcategories live within a Workspace.
While Workspaces are currently optional, selecting an industry catalogue will automatically create the Workspace in future releases. Selecting or enabling a Rope Access catalogue, will create a Rope Access Register workspace. Currently, your membership to a workspace is a personal preference, but in the future administrators can manage membership to workspaces and make them hidden.
## Creating a Workspace
* Click the orange icon, up the top right near the company name/logo.
* Click "System Defaults".
* At the top are multiple grey tabs, Click the tab "Workspace"
* All workspaces both active and inactive are shown.
* Click the "Add Workspace".
* In the Workspace create window, enter the Name of your workspace
* If required, enter the contact details of the person responsible for the workspace.
* "Industry Type" is a work In Progress and should not be selected at this time. This will limit the product catalogue in the Add Assets search.
* Select Save to save your newly created workspace.
## Editing your Workspace
In the Workspace list page
* Select the edit pencil associated with the workspace on the RHS
* Edit the Workspace name and contact details, if required
* Select the Save button to update the changes
Once the changes are saved, all associated references in the system will be updated.
## Deleting a Workspace
In the Workspace list page
* Select the bin icon on the RHS of the respective Workspace
* Select the OK confirmation button
* Note – If there is any linkage of the Workspace to an asset record, you will be prevented from deleting the Workspace.
## System Navigation and Definitions
## Dashboard screen navigation
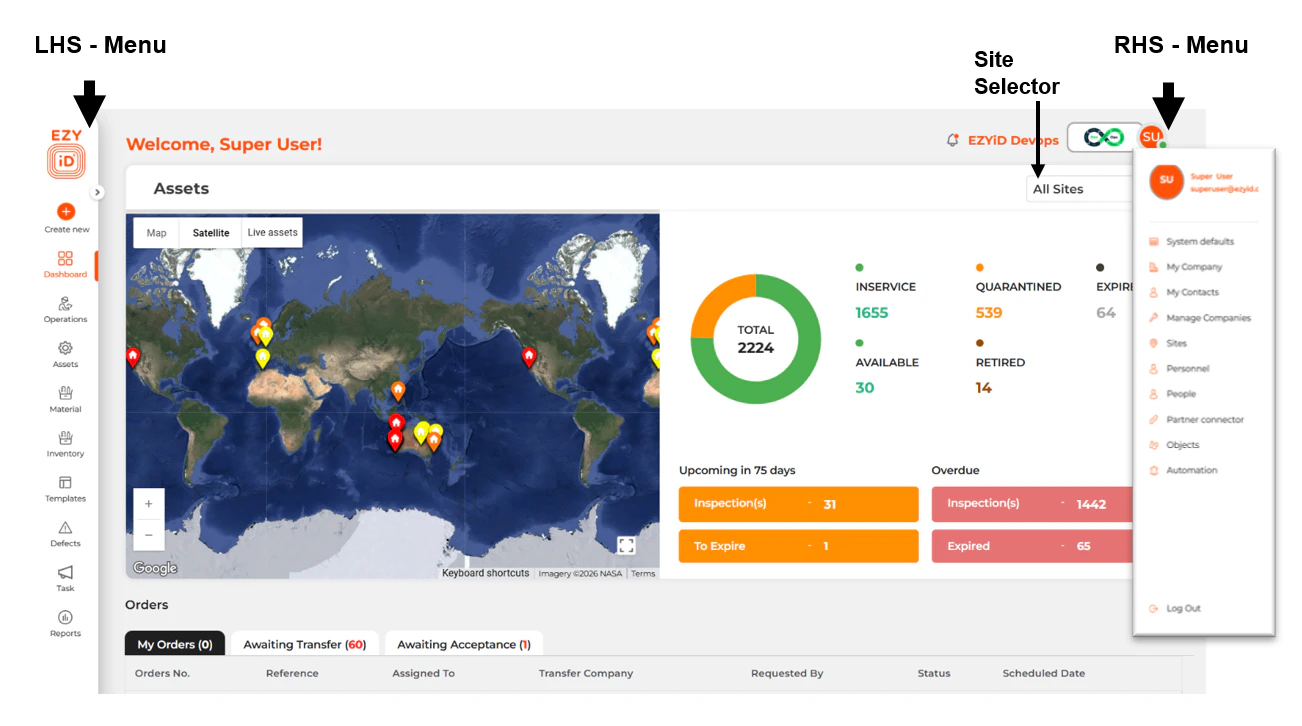 ## Table Navigation Bar
 Refer to definition of each function in the [Table Navigation](#_Table_Navigation_bar) section
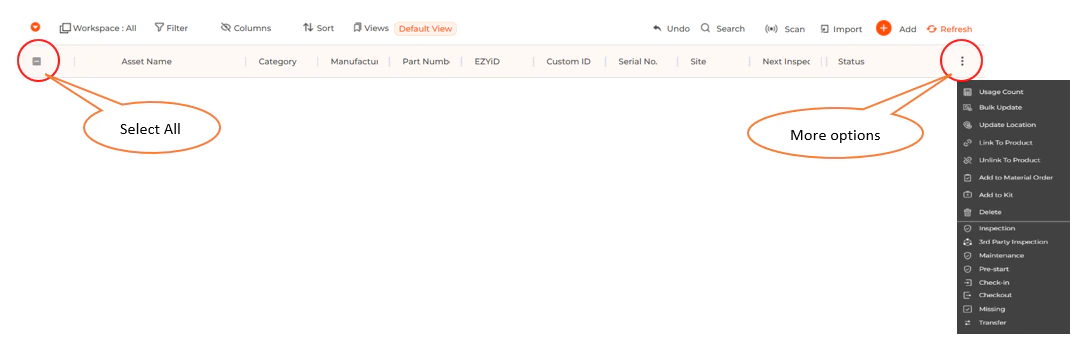
## Table Menu
Refer to definition of each function in the [Table Navigation](#_Table_Navigation_bar) section
## Table Menu
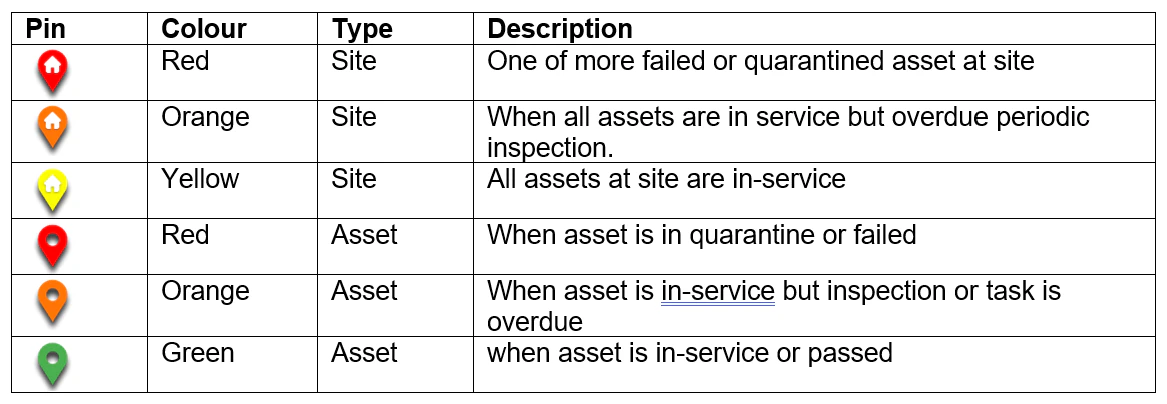
 ## Update to your Site and Asset Pins on your map
A location pin with a home symbol will now be your standard Site pin. Asset pins now have a traffic light colour system to alert of overdue inspections and display failed and in-service assets. The key changes are setout below:
## Update to your Site and Asset Pins on your map
A location pin with a home symbol will now be your standard Site pin. Asset pins now have a traffic light colour system to alert of overdue inspections and display failed and in-service assets. The key changes are setout below:
 To update the location of your asset, select the asset and select the shortcut to “Update Location”. Asset location (Lat/long) data is automatically updated when an asset is transferred to a site. The asset is updated with the sites’ location or project attributes.
## Setting up your EZYiD Essentials account
1. Access [EZYiD.io](http://EZYiD.io) in a web browser and sign in using the temporary password provided by email.
2. Create a new password, then complete the sign-in process again.
3. Select the user initials to open the right-hand side menu.
4. Select “**People**” to open the user accounts page.
5. Select the edit pen icon next to the relevant username to open the account.
6. Set “**User Persona**” to the applicable industry classification.
7. Enter the Employee ID and Badge ID. Entry of an Employee ID or Access Pass ID automatically creates a Personnel/Crew account, enabling access to the app portal and kiosk terminals. Personnel accounts without an email address cannot access the app portal.
8. Update “Workspaces” as required. Access can be restricted according to workspace permissions.
9. Set the default “**Site**” and any additional required sites. Selecting “**Select All**” grants access to all current and future sites.
10. Set the “**Time Zone**” used by the notification system for upcoming and overdue inspection alerts.
11. Select the “**Two Factor Authentication**” checkbox to enable 2FA for the user.
12. Select the “**Administrator**” checkbox to permit purchase of additional services. Only administrators can use the Buy More button on the People page. Administrator access is also required to delete records in the Asset Table. To remove ‘**delete**’ privileges, clear the Administrator checkbox.
13. Update user privileges at the bottom of the page, if required.
14. Select “**Save**” to apply the account changes.
## Setting up your EZYiD Manager account (for EZYiD Manager accounts only)
1. Access [EZYiD.io](http://EZYiD.io) in a web browser and sign in using the temporary password provided by email.
2. Create a new password, then complete the sign-in process again.
3. Select the user initials to open the right-hand side menu.
4. Select “**People**” to open the user accounts page.
5. Select the edit pen icon next to the relevant username to open the account.
6. Set “**User Persona**” to the applicable industry classification.
7. Enter the Employee ID and Badge ID. Entry of an Employee ID or Access Pass ID automatically creates a Personnel/Crew account, enabling access to the app portal and kiosk terminals. Personnel accounts without an email address cannot access the app portal.
8. Update “Workspaces” as required. Access can be restricted according to workspace permissions.
9. Set the default “**Site**” and any additional required sites. Selecting “**Select All**” grants access to all current and future sites.
10. Set the “**Time Zone**” used by the notification system for upcoming and overdue inspection alerts.
11. Select the “**Two Factor Authentication**” checkbox to enable 2FA for the user.
12. Select the “**Administrator**” checkbox to permit purchase of additional services. Only administrators can use the Buy More button on the People page. Administrator access is also required to delete records in the Asset Table. To remove ‘**delete**’ privileges, clear the Administrator checkbox.
13. Update user privileges at the bottom of the page, if required.
14. Select “**Save**” to apply the account changes.
## Setting up your EZYiD Customer accounts
An EZYiD Manager account can be used to configure customer accounts for management purposes. Both EZYiD Essentials and EZYiD Lite (Mobile app) user accounts can be configured for customer organisations. By default, customer organisations can create an account from the Login page by selecting **Sign-up**.
To create a customer account:
1. Select the user initials to open the right-hand side menu.
2. Select **Manage Companies** to open the partner’s page.
3. Select the orange **New Partner** button, top right-hand side, to create the customer account.
4. Enter the organisation name in the **Company name** text box.
5. Select the appropriate industry subscription(s).
6. Select a Time Zone.
7. Select “ADD COMPANY LOGO” to upload a Company Logo. \
Select Continue
8. Select a Package, choose from the yearly drop down to change payment cycle. \
Select Continue.
9. Enter the Main Contact's first name, last name, and email address for the organisation. \
An internal email address may be used during initial setup before customer onboarding. The email address can be updated after the EZYiD user account has been presented to the client.\
N.B. The main contact name of your customer organisation cannot be changed. If you wish to change the name, you will need to deactivate the account to “Inactive” and create a new account for the customer organisation.
# Customer View access to their compliance records
Service providers can now offer view access to their asset/equipment records via the **Crew Role**. To create a view role for your customer:
To Create a New Customer contact:
1. Click on the RHS menu and Click on “My Contacts”
2. Click on “Add New Contacts”
3. Enter Customer Name
4. Select Type as “Customer”
5. Enter Email
6. Select the “Projects” tab
7. Select “Select Site” for existing customers. By default a new site will be created if you do not select a site from your existing list.
8. Click on “Create Contact” to save the contact
After your Customer contact has been created, you will need to create the Crew Role
1. To create a new Crew Account
2. Click on “Personnel” from the RHS menu
3. Click on “Add Personnel”
4. Enter the name of the authorised customer contact
5. Enter their email address
6. Select the Company from the Company dropdown
7. Site and Project will be automatically inherited from the Contact
8. Click on the “Create Personnel” to save the crew account
Crew accounts can be accessed via the app portal at [www.app.ezyid.io](http://www.app.ezyid.io)
1. Enter your email
2. Enter the One-Time-Password
# Setting up your default preferences
## Quick Setup Checklist
The default preferences for the organisation are spread across a number of pages. The defaults setting checklist is set out below.
The best practice approach would be to follow the following sequence with your setup.
1. Selecting product catalogues (industry types)
2. Setting up Categories and hierarchies
3. Creating workspaces
4. Creating Sites, Projects and Locations
### Section 1 – Enabling product catalogues
| Parameter | How to access | Description & Example |
| :------------ | :---------------------------------------------------------------------------------------------------------------------------------------------------------------------------------------------------------------------------------------------------------------------------------------------------------------------------- | :------------------------------------------------------------------------------------------------------------------------------------------------------------------------------------------------------------------------------------------------------------------------------------------------------------------------------------------------------------------------------------------------------------------------------------------------------------ |
| Industry Type | Industry Catalogues are in the **System Defaults** page:
To update the location of your asset, select the asset and select the shortcut to “Update Location”. Asset location (Lat/long) data is automatically updated when an asset is transferred to a site. The asset is updated with the sites’ location or project attributes.
## Setting up your EZYiD Essentials account
1. Access [EZYiD.io](http://EZYiD.io) in a web browser and sign in using the temporary password provided by email.
2. Create a new password, then complete the sign-in process again.
3. Select the user initials to open the right-hand side menu.
4. Select “**People**” to open the user accounts page.
5. Select the edit pen icon next to the relevant username to open the account.
6. Set “**User Persona**” to the applicable industry classification.
7. Enter the Employee ID and Badge ID. Entry of an Employee ID or Access Pass ID automatically creates a Personnel/Crew account, enabling access to the app portal and kiosk terminals. Personnel accounts without an email address cannot access the app portal.
8. Update “Workspaces” as required. Access can be restricted according to workspace permissions.
9. Set the default “**Site**” and any additional required sites. Selecting “**Select All**” grants access to all current and future sites.
10. Set the “**Time Zone**” used by the notification system for upcoming and overdue inspection alerts.
11. Select the “**Two Factor Authentication**” checkbox to enable 2FA for the user.
12. Select the “**Administrator**” checkbox to permit purchase of additional services. Only administrators can use the Buy More button on the People page. Administrator access is also required to delete records in the Asset Table. To remove ‘**delete**’ privileges, clear the Administrator checkbox.
13. Update user privileges at the bottom of the page, if required.
14. Select “**Save**” to apply the account changes.
## Setting up your EZYiD Manager account (for EZYiD Manager accounts only)
1. Access [EZYiD.io](http://EZYiD.io) in a web browser and sign in using the temporary password provided by email.
2. Create a new password, then complete the sign-in process again.
3. Select the user initials to open the right-hand side menu.
4. Select “**People**” to open the user accounts page.
5. Select the edit pen icon next to the relevant username to open the account.
6. Set “**User Persona**” to the applicable industry classification.
7. Enter the Employee ID and Badge ID. Entry of an Employee ID or Access Pass ID automatically creates a Personnel/Crew account, enabling access to the app portal and kiosk terminals. Personnel accounts without an email address cannot access the app portal.
8. Update “Workspaces” as required. Access can be restricted according to workspace permissions.
9. Set the default “**Site**” and any additional required sites. Selecting “**Select All**” grants access to all current and future sites.
10. Set the “**Time Zone**” used by the notification system for upcoming and overdue inspection alerts.
11. Select the “**Two Factor Authentication**” checkbox to enable 2FA for the user.
12. Select the “**Administrator**” checkbox to permit purchase of additional services. Only administrators can use the Buy More button on the People page. Administrator access is also required to delete records in the Asset Table. To remove ‘**delete**’ privileges, clear the Administrator checkbox.
13. Update user privileges at the bottom of the page, if required.
14. Select “**Save**” to apply the account changes.
## Setting up your EZYiD Customer accounts
An EZYiD Manager account can be used to configure customer accounts for management purposes. Both EZYiD Essentials and EZYiD Lite (Mobile app) user accounts can be configured for customer organisations. By default, customer organisations can create an account from the Login page by selecting **Sign-up**.
To create a customer account:
1. Select the user initials to open the right-hand side menu.
2. Select **Manage Companies** to open the partner’s page.
3. Select the orange **New Partner** button, top right-hand side, to create the customer account.
4. Enter the organisation name in the **Company name** text box.
5. Select the appropriate industry subscription(s).
6. Select a Time Zone.
7. Select “ADD COMPANY LOGO” to upload a Company Logo. \
Select Continue
8. Select a Package, choose from the yearly drop down to change payment cycle. \
Select Continue.
9. Enter the Main Contact's first name, last name, and email address for the organisation. \
An internal email address may be used during initial setup before customer onboarding. The email address can be updated after the EZYiD user account has been presented to the client.\
N.B. The main contact name of your customer organisation cannot be changed. If you wish to change the name, you will need to deactivate the account to “Inactive” and create a new account for the customer organisation.
# Customer View access to their compliance records
Service providers can now offer view access to their asset/equipment records via the **Crew Role**. To create a view role for your customer:
To Create a New Customer contact:
1. Click on the RHS menu and Click on “My Contacts”
2. Click on “Add New Contacts”
3. Enter Customer Name
4. Select Type as “Customer”
5. Enter Email
6. Select the “Projects” tab
7. Select “Select Site” for existing customers. By default a new site will be created if you do not select a site from your existing list.
8. Click on “Create Contact” to save the contact
After your Customer contact has been created, you will need to create the Crew Role
1. To create a new Crew Account
2. Click on “Personnel” from the RHS menu
3. Click on “Add Personnel”
4. Enter the name of the authorised customer contact
5. Enter their email address
6. Select the Company from the Company dropdown
7. Site and Project will be automatically inherited from the Contact
8. Click on the “Create Personnel” to save the crew account
Crew accounts can be accessed via the app portal at [www.app.ezyid.io](http://www.app.ezyid.io)
1. Enter your email
2. Enter the One-Time-Password
# Setting up your default preferences
## Quick Setup Checklist
The default preferences for the organisation are spread across a number of pages. The defaults setting checklist is set out below.
The best practice approach would be to follow the following sequence with your setup.
1. Selecting product catalogues (industry types)
2. Setting up Categories and hierarchies
3. Creating workspaces
4. Creating Sites, Projects and Locations
### Section 1 – Enabling product catalogues
| Parameter | How to access | Description & Example |
| :------------ | :---------------------------------------------------------------------------------------------------------------------------------------------------------------------------------------------------------------------------------------------------------------------------------------------------------------------------- | :------------------------------------------------------------------------------------------------------------------------------------------------------------------------------------------------------------------------------------------------------------------------------------------------------------------------------------------------------------------------------------------------------------------------------------------------------------ |
| Industry Type | Industry Catalogues are in the **System Defaults** page:
1. Select the RHS menu from your user initials
2. Select "**System Defaults**"
3. Select the "**My Industries**" tab
4. Select "**Add New Industry**"
5. Select Industries to access the product catalogues
6. Select "**Save**" | Subscription to manufacturer catalogues for the respective industries. Available industry types: Rope Access, Lifting & Rigging, Rescue, Search & Rescue, Adventure Parks, Arborist, Facilities Management, Tooling.
**NOTE:** Industry Catalogues may include publicly extracted information from websites and published products on the EZYiD eco-system and can change from time-to-time. EZYiD does not guarantee the integrity of such data. |
### Section 2 – Asset classification or group label
| Parameter | How to access | Description & Example |
| :------------- | :-------------------------------------------------------------------------------------------------------------------------------------------------------------------------------------------------------------------------------------------------------------------------------------------------------------- | :------------------------------------------------------------------------------------------------------------------------------------------------------------------------------------------------------------------------------------------------------------------------------------------------------------------------------------------------------------------------------------------------------ |
| Categories | Categories are in the **System Defaults** page:
1. Select the RHS menu from your user initials
2. Select "**System Defaults**" → "**Categories**"
3. Select "**Add New Category**"
4. Select Industries, enter the Category name, optionally link to a parent
5. Select "**Save**" | A label or data tag to organise your data. Industrial users often label hardware by material (eg Rope Sling, Wire Sling) or application or load weight.
**Shared Categories:** Created by manufacturers. When you subscribe to an Industry catalogue, associated categories are shared to your account. Administrators can create a hierarchy and disable or hide unused shared categories. |
| Sub-categories | Same as Categories — when adding a category, select a Parent Category from the dropdown. | A sub-classification under a primary category. Eg: Harness → Sit Harness, Chest Harness, Full Body Harness. |
### Section 3 – What is the purpose and use of the assets
| Parameter | How to access | Description & Example |
| :-------- | :---------------------------------------------------------------------------------------------------------------------------------------------------------------------------------------------------------------------------------------------- | :--------------------------------------------------------------------------------------------------------------------------------------------------------------------------------------------------- |
| Workspace | **Workspaces** are in the **System Defaults** page:
1. Select the RHS menu from your user initials
2. Select "**System Defaults**" → "**Workspace**"
3. Select "**Add Workspace**", enter the name
4. Select "**Save**" | Define your registers, Teams/Crews/Departments. Eg: Rope Access Register, Rigging Register, Tool Register, BA & Hazmat Register, Test & Tag Register. Crews: ERT, Shutdown, Turnaround, Maintenance. |
### Section 4 – The physical location of your assets
| Parameter | How to access | Description & Example |
| :-------- | :----------------------------------------------------------------------------------------------------------------------------------------------------------------------------------------------------------------------------------------------------------------------------------------------------------------------------------------------------------------------------------------------------------------------------------------------------------------------------------------------------------------------------------------------------------------------------------------------------------------------------------------------------------- | :----------------------------------------------------------------------------------------------------------------------------------------------------------------------------------------------------------------------------- |
| Sites | **Sites** are in the **System Defaults** page:
1. Select the RHS menu from your user initials
2. Select "**System Defaults**" → "**Sites**"
3. Select "+**Add**", enter the name
4. Select "**Workspace"** if applicable
5. Select "**Save**"
6. Select edit pencil to edit site details
7. Tick the "Warehouse" box if applicable
8. Select the "**maps**" button
9. Type the site address then click on the magnifying glass
10. If the pin is correctly placed select "**Pick**"
11. Select Save
**NOTE:** Do not categorise vehicles or containers as sites — set those up as kits. | Physical locations where work is undertaken and equipment is maintained. Sites must have a physical address to appear as a map pin. Sites can also have a geofence to notify when tracked assets enter or breach the boundary. |
| Locations | RHS Menu → System Defaults → Locations → Add Location. Select the Site, enter the Location name, select "**Save**". | A specific area within a site or warehouse (eg yard, container, shelf racking). Useful for finding assets and inventory management. |
| Projects | RHS Menu → System Defaults → Projects → Add New Project. Select the Site, enter the Project name and optional Cost Centre, select "**Save**". | Work activities undertaken at a site. A functional location where construction or maintenance tasks are performed. |
### Section 5 – Advanced Settings
| Parameter | How to access | Description & Example |
| :------------ | :------------------------------------------------------------------------------------------------------------------ | :-------------------------------------------------------------------------------------------------------------------------------------- |
| Task Type | RHS Menu → System Defaults → Task Types → Add New Task. Enter a Task Name, select the Task Type, select "**Save**". | Three types: **Safety** (Thorough Examination), **Checkup** (pre-starts, before/after-use checks), **Maintenance** (calibration tasks). |
| Asset Status | RHS Menu → System Defaults → Asset Status | Customise the status label name and colour. |
| Active Tags | RHS Menu → System Defaults → Active Tags | Activate your GPS trackers. |
| Custom Fields | RHS Menu → System Defaults → Custom Fields | Add additional fields to capture extra asset properties. |
| Competencies | RHS Menu → System Defaults → Competencies | Create a competency list to manage checklist completion. Link competencies to checklists and manage your competent person list. |
### Section 6 – What is the purpose and use of the assets
| Parameter | How to access | Description & Example |
| :-------- | :--------------------------------------------------------------------------------------------------------------------------------------------------------------------------------------------------------------------------------------------- | :--------------------------------------------------------------------------------------------------------------------------------------------------------------------------------------------------- |
| Workspace | **Workspaces** are in the **System Defaults** page:
1. Select the RHS menu from your user initials
2. Select "**System Defaults**" → "**Workspace**"
3. Select "**Add Workspace**", enter the name
4. Select "**Save**" | Define your registers, Teams/Crews/Departments. Eg: Rope Access Register, Rigging Register, Tool Register, BA & Hazmat Register, Test & Tag Register. Crews: ERT, Shutdown, Turnaround, Maintenance. |
### Section 7 – The physical location of your assets
| Parameter | How to access | Description & Example |
| :-------- | :-------------------------------------------------------------------------------------------------------------------------------------------------------------------------------------------------------------------------------------------------------------------------------------------------------------------------------------------------------------------------------------------------------------------------------------------------- | :----------------------------------------------------------------------------------------------------------------------------------------------------------------------------------------------------------------------------- |
| Sites | **Sites** are in the **System Defaults** page:
1. Select the RHS menu from your user initials
2. Select "**System Defaults**" → "**Sites**"
3. Select "**Add Site**", enter the name, enable "Warehouse" if applicable
4. Select "**Map**" to pin the site, enter the address, select "**Pick**"
5. Select "**Save**"
**NOTE:** Do not categorise vehicles or containers as sites — set those up as kits. | Physical locations where work is undertaken and equipment is maintained. Sites must have a physical address to appear as a map pin. Sites can also have a geofence to notify when tracked assets enter or breach the boundary. |
| Locations | System Defaults → Locations → Add Location. Select the Site, enter the Location name, select "**Save**". | A specific area within a site or warehouse (eg yard, container, shelf racking). Useful for finding assets and inventory management. |
| Projects | System Defaults → Projects → Add New Project. Select the Site, enter the Project name and optional Cost Centre, select "**Save**". | Work activities undertaken at a site. A functional location where construction or maintenance tasks are performed. |
### Section 8 – Advanced Settings
| Parameter | How to access | Description & Example |
| :------------ | :------------------------------------------------------------------------------------------------------- | :-------------------------------------------------------------------------------------------------------------------------------------- |
| Task Type | System Defaults → Task Types → Add New Task. Enter a Task Name, select the Task Type, select "**Save**". | Three types: **Safety** (Thorough Examination), **Checkup** (pre-starts, before/after-use checks), **Maintenance** (calibration tasks). |
| Asset Status | System Defaults → Asset Status | Customise the status label name and colour. |
| Active Tags | System Defaults → Active Tags | Activate your GPS trackers. |
| Custom Fields | System Defaults → Custom Fields | Add additional fields to capture extra asset properties. |
| Competencies | System Defaults → Competencies | Create a competency list to manage checklist completion. Link competencies to checklists and manage your competent person list. |
**Other Settings**
## Updating Company page
1. The company page is where the company name, the logo and other related settings are available.
2. To allow other subscribers to explore and connect with you, Click on the checkbox, “**Accept Partner invites**” to connect with other members in the EZYiD ecosystem. When selected/checked, your organisation becomes visible in the Partner Connector, Explorer tab to other organisation who may wish to send you an invite to connect.
3. The “**Alert Interval number**”, is the number of days prior to the “Inspection Date” where an “Upcoming Inspection” reminder and alert will be displayed against the asset.
4. The “**Inspection Interval**”, is the number of days prior to the “Inspection Date” where an inspection can be completed and closed.
## Setting up a New Industry Type
Industry type setup are a system admin privilege. Please send request to [**support@ezyid.com**](mailto:support@ezyid.com)
## User Personas
Personas are a representation of a user experience within an industry type classification. Personas allow the personalisation of the user interface for the respective industry type allowing you to rename or hide unnecessary data attributes within the Table view and the add and edit pages. The changing of data labels to suit the user experience is an example of a persona.
User personas are generally linked to an Industry Type and applied across the organisation. When the organisation administrator makes changes to an industry persona, all users in the organisation associated with the industry persona will have the change applied to their views.
Personas are linked to the EZYiD user account and must be set when creating the subscription account or when you first login.
To change the Industry Persona, Click on **People** on the RHS menu and open the user account that you wish to update. Select the **User Persona** from the dropdown options.
Should you wish to change or hide any data labels in your industry persona, contact [support@ezyid.com](mailto:support@ezyid.com)
Future releases will allow you to update your industry persona, personalised for your organisation.
## Sites
Sites are the physical location where you either conduct business or provide a service to a customer. Mapping an asset as a site is not recommended (such as containers, fixed plant, vehicles).
1. To setup your Sites, click on the RHS menu
2. Click on the **“Sites”** tab
3. Click on the “+**Add**” button
4. Enter the name of your site in the Create New Site dialog window and click on “**Save**”
5. To enter the address of the site and if you want the site to display as a pin in the map interface, you will need to update the address in the map.
6. Click on the edit pen  of the site you wish to update
7. All companies must have a default site or warehouse. To select your warehouse site, select the “**Warehouse**” **checkbox** in the Edit Site dialog window.
8. Click on the “**Maps**” button (you cannot update the address)
9. In the “**Select Location**” window search box, enter the address and click on the
of the site you wish to update
7. All companies must have a default site or warehouse. To select your warehouse site, select the “**Warehouse**” **checkbox** in the Edit Site dialog window.
8. Click on the “**Maps**” button (you cannot update the address)
9. In the “**Select Location**” window search box, enter the address and click on the  icon to locate the address.
10. If you wish to pin the address to your current location, Click on the “**Locate me**” button
11. You can zoom to the preferred elevation or update the location pin on the map and Click on “**Pick**” to save the address.
12. You can now set a “**GeoRadius**” for your site. The UoM for your geofence is set in meters. Refer to “Geofencing your assets to a site”
13. Click on “**Save”** button in the site page to save the settings.
## Projects
Projects are activities undertaken at sites.
1. To setup your Projects, click on the RHS menu
2. Click on “**System Defaults”**
3. Click on “**Projects”**
4. Select the “**Site**” in the dropdown
5. Enter the name of your project in the text box
6. Click on “**Save**” to create the project.
7. To update the Project location on the map,
8. Click on the edit pen
icon to locate the address.
10. If you wish to pin the address to your current location, Click on the “**Locate me**” button
11. You can zoom to the preferred elevation or update the location pin on the map and Click on “**Pick**” to save the address.
12. You can now set a “**GeoRadius**” for your site. The UoM for your geofence is set in meters. Refer to “Geofencing your assets to a site”
13. Click on “**Save”** button in the site page to save the settings.
## Projects
Projects are activities undertaken at sites.
1. To setup your Projects, click on the RHS menu
2. Click on “**System Defaults”**
3. Click on “**Projects”**
4. Select the “**Site**” in the dropdown
5. Enter the name of your project in the text box
6. Click on “**Save**” to create the project.
7. To update the Project location on the map,
8. Click on the edit pen  of the project you wish to update
9. Click on the “**Map**” button
10. In the “**Select Location**” window search box, enter the address and click on the
of the project you wish to update
9. Click on the “**Map**” button
10. In the “**Select Location**” window search box, enter the address and click on the  icon to locate the address.
11. If you wish to pin the address to your current location, Click on the “**Locate me**” button
12. You can zoom to the preferred elevation or update the location pin on the map and Click on “**Pick**” to save the address.
13. Projects now have a start date and end date. These dates will be used for our resource planning timeline charts under development.
14. Click on “**Save”** button in the project page to save the settings.
## Categories
Category is a label or data tag you can use to meaningfully organise your data to help you navigate and find records quickly and easily.
Industrial users often name or label their hardware by the material used to produce the product (eg Rope Sling or a Wire Sling) or the application (anchor) or its load weight.
Base primary categories have been created and shared for some industry sectors. These shared categories are activated when an industry type is enabled from your System Defaults page. These shared categories can be very helpful for beginners or operators using EZYiD to manage just one register, eg. RA Register.
To enable contextual differentiation between a “Sling” for rope access and rigging, we have now enabled a tiered hierarchy (Category and Sub-Category) to classify your records. To create this multi-tier hierarchy, you can now create your own categories without the need to use the shared categories. All categories created are visible within your organisation only.
When an Industry type is selected, all categories associated with the industry catalogue is shared and activated in your category list.
You can now **disable** those shared categories while having access to the product catalogue / properties.
When you click on the “**Disable Shared Categories”** button, all un-used shared categories are automatically made inactive and not available for use. You can also individually disable or re-activate a category, if required.
Note, if a category is in-use (ie. Used by a asset), the system will not allow the category to be disabled.
You can also Hide Inactive categories by clicking on the “**Hide Inactive**” button. This provision reduces the list of categories visible on the page.
**To create a Category,**
1. To create your Category, click on the RHS menu
2. Click on “**System Defaults”**
3. Click on the “**Category**” tab
4. If you have not selected your Industry Type in “My Industry Types” you will not see any categories.
5. Click on the “**Add New Category**” button
6. Select the “**Industry type (s)**” for your category
7. Enter the name of your Category in text box
8. Click on “**Save**” to create the Custom Category
**To create a Sub-Category,**
1. To setup your Sub-Category, click on the RHS menu
2. Click on the “**Add New Category**” button
3. Select the “**Industry type (s)**” for your category
4. Enter the name of your Category in text box
5. Now Select the “**Parent Category**” from the dropdown
6. Click on “**Save**” to create the Category
**Updating your Category Name**
To change the name or correct a Category name
1. Click on the edit pen
icon to locate the address.
11. If you wish to pin the address to your current location, Click on the “**Locate me**” button
12. You can zoom to the preferred elevation or update the location pin on the map and Click on “**Pick**” to save the address.
13. Projects now have a start date and end date. These dates will be used for our resource planning timeline charts under development.
14. Click on “**Save”** button in the project page to save the settings.
## Categories
Category is a label or data tag you can use to meaningfully organise your data to help you navigate and find records quickly and easily.
Industrial users often name or label their hardware by the material used to produce the product (eg Rope Sling or a Wire Sling) or the application (anchor) or its load weight.
Base primary categories have been created and shared for some industry sectors. These shared categories are activated when an industry type is enabled from your System Defaults page. These shared categories can be very helpful for beginners or operators using EZYiD to manage just one register, eg. RA Register.
To enable contextual differentiation between a “Sling” for rope access and rigging, we have now enabled a tiered hierarchy (Category and Sub-Category) to classify your records. To create this multi-tier hierarchy, you can now create your own categories without the need to use the shared categories. All categories created are visible within your organisation only.
When an Industry type is selected, all categories associated with the industry catalogue is shared and activated in your category list.
You can now **disable** those shared categories while having access to the product catalogue / properties.
When you click on the “**Disable Shared Categories”** button, all un-used shared categories are automatically made inactive and not available for use. You can also individually disable or re-activate a category, if required.
Note, if a category is in-use (ie. Used by a asset), the system will not allow the category to be disabled.
You can also Hide Inactive categories by clicking on the “**Hide Inactive**” button. This provision reduces the list of categories visible on the page.
**To create a Category,**
1. To create your Category, click on the RHS menu
2. Click on “**System Defaults”**
3. Click on the “**Category**” tab
4. If you have not selected your Industry Type in “My Industry Types” you will not see any categories.
5. Click on the “**Add New Category**” button
6. Select the “**Industry type (s)**” for your category
7. Enter the name of your Category in text box
8. Click on “**Save**” to create the Custom Category
**To create a Sub-Category,**
1. To setup your Sub-Category, click on the RHS menu
2. Click on the “**Add New Category**” button
3. Select the “**Industry type (s)**” for your category
4. Enter the name of your Category in text box
5. Now Select the “**Parent Category**” from the dropdown
6. Click on “**Save**” to create the Category
**Updating your Category Name**
To change the name or correct a Category name
1. Click on the edit pen  of the Category and change the name
2. Click on “**Save”** to save the changes
**Deleting a Category**
1. You can delete categories that do not have assets or records associated with the category.
2. Click on the
of the Category and change the name
2. Click on “**Save”** to save the changes
**Deleting a Category**
1. You can delete categories that do not have assets or records associated with the category.
2. Click on the  icon along side the category
3. Click on “OK” to save the changes
**Updating the Category of your assets**
You can change the Category of your asset now.
1. Search the Asset name or part no or manufacturer and select your product properties.
2. Click on the **Category dropdown** and select your desired category.
3. You can change the category type for both assets created from the product catalogue and your own assets.
## Uploading EZYiD Categories
## Steps
1. Go to the Asset Import page.
2. Click Import Data.
3. Select Categories.
4. Upload the completed Excel template.
5. Wait for the import process to complete and review any validation messages.
# Excel Template Format
The Excel file must contain the following columns in order:
| | | |
| ------------------- | ---------------------------- | ------------ |
| **Column** | **Description** | **Required** |
| Industry | Main industry classification | Yes |
| Primary Category | Top-level category | Yes |
| Secondary Category | Second-level category | No |
| Tertiary Category | Third-level category | No |
| Quaternary Category | Fourth-level category | No |
# Example Excel Format
| | | | | |
| ------------ | --------------------- | -------------------------------------- | --------------------------- | ----------------------- |
| **Industry** | **Primary Category** | **Secondary Category** | **Tertiary Category** | **Quaternary Category** |
| TESTING | Material Testing | Surface Profiling / Finish Measurement | Friction & Wear Measurement | Tribometer |
| TESTING | Material Testing | Hardness Testing | Tester | |
| TESTING | Material Testing | Surface Profiling / Finish Measurement | Surface Roughness Gauge | |
| TESTING | Material Testing | Hardness Testing | Calibration / Reference | Block |
| TESTING | Measurement Equipment | Noise / Acoustic Monitoring | Sound Level Meter | |
| TESTING | Pressure Testing | Pump | | |
| TESTING | Electrical Testing | Measurement Tool | Current Clamp | |
# Notes
* Use the provided Excel template format exactly as shown.
* Do not rename or reorder the columns.
* Empty values are allowed for Tertiary Category and Quaternary Category when not applicable.
* Ensure there are no duplicate category rows before importing.
* Save the file as .xlsx before uploading.
## Using Categories in Asset Import
## Overview
The Category column in Asset Import supports two formats:
1. Plain text category name
2. `ID`:`Name` format
Both formats are accepted during import.
## Supported Formats
## 1. Plain Text Format
You can provide only the category name.
Example:
Jama Helmet Blue
Use this format when the category name is unique and already exists in the system.
## 2. ID and Name Format
You can also provide the category using the following format:
`ID`:`Name`
Example:
1231:Jama Helmet Blue
Where:
* 1231 = Category ID
* Jama Helmet Blue = Category Name
This format is recommended to avoid conflicts when multiple categories have similar names.
# Asset Import Example
| | |
| ---------------- | --------------------- |
| **Asset Name** | **Category** |
| Helmet Asset 001 | Jama Helmet Blue |
| Helmet Asset 002 | 1231:Jama Helmet Blue |
# Recommendations
* Prefer using the `ID`:`Name` format for more accurate category matching.
* Ensure the category already exists before importing assets.
* Do not include extra spaces before or after the colon (:).
Correct:
1231:Jama Helmet Blue
Incorrect:
1231 : Jama Helmet Blue
## Asset Status Labels
You can now change your asset status labels to suit your industry vernacular.
To update your labels:
Click on the “System Defaults”, in your RHS menu and select the “Asset Status” tab.
icon along side the category
3. Click on “OK” to save the changes
**Updating the Category of your assets**
You can change the Category of your asset now.
1. Search the Asset name or part no or manufacturer and select your product properties.
2. Click on the **Category dropdown** and select your desired category.
3. You can change the category type for both assets created from the product catalogue and your own assets.
## Uploading EZYiD Categories
## Steps
1. Go to the Asset Import page.
2. Click Import Data.
3. Select Categories.
4. Upload the completed Excel template.
5. Wait for the import process to complete and review any validation messages.
# Excel Template Format
The Excel file must contain the following columns in order:
| | | |
| ------------------- | ---------------------------- | ------------ |
| **Column** | **Description** | **Required** |
| Industry | Main industry classification | Yes |
| Primary Category | Top-level category | Yes |
| Secondary Category | Second-level category | No |
| Tertiary Category | Third-level category | No |
| Quaternary Category | Fourth-level category | No |
# Example Excel Format
| | | | | |
| ------------ | --------------------- | -------------------------------------- | --------------------------- | ----------------------- |
| **Industry** | **Primary Category** | **Secondary Category** | **Tertiary Category** | **Quaternary Category** |
| TESTING | Material Testing | Surface Profiling / Finish Measurement | Friction & Wear Measurement | Tribometer |
| TESTING | Material Testing | Hardness Testing | Tester | |
| TESTING | Material Testing | Surface Profiling / Finish Measurement | Surface Roughness Gauge | |
| TESTING | Material Testing | Hardness Testing | Calibration / Reference | Block |
| TESTING | Measurement Equipment | Noise / Acoustic Monitoring | Sound Level Meter | |
| TESTING | Pressure Testing | Pump | | |
| TESTING | Electrical Testing | Measurement Tool | Current Clamp | |
# Notes
* Use the provided Excel template format exactly as shown.
* Do not rename or reorder the columns.
* Empty values are allowed for Tertiary Category and Quaternary Category when not applicable.
* Ensure there are no duplicate category rows before importing.
* Save the file as .xlsx before uploading.
## Using Categories in Asset Import
## Overview
The Category column in Asset Import supports two formats:
1. Plain text category name
2. `ID`:`Name` format
Both formats are accepted during import.
## Supported Formats
## 1. Plain Text Format
You can provide only the category name.
Example:
Jama Helmet Blue
Use this format when the category name is unique and already exists in the system.
## 2. ID and Name Format
You can also provide the category using the following format:
`ID`:`Name`
Example:
1231:Jama Helmet Blue
Where:
* 1231 = Category ID
* Jama Helmet Blue = Category Name
This format is recommended to avoid conflicts when multiple categories have similar names.
# Asset Import Example
| | |
| ---------------- | --------------------- |
| **Asset Name** | **Category** |
| Helmet Asset 001 | Jama Helmet Blue |
| Helmet Asset 002 | 1231:Jama Helmet Blue |
# Recommendations
* Prefer using the `ID`:`Name` format for more accurate category matching.
* Ensure the category already exists before importing assets.
* Do not include extra spaces before or after the colon (:).
Correct:
1231:Jama Helmet Blue
Incorrect:
1231 : Jama Helmet Blue
## Asset Status Labels
You can now change your asset status labels to suit your industry vernacular.
To update your labels:
Click on the “System Defaults”, in your RHS menu and select the “Asset Status” tab.
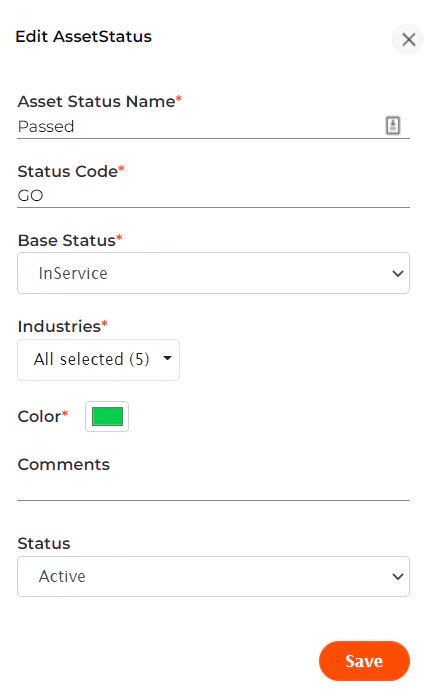 Click on the “Add New Asset Status” and update the form with the Status label, Code, select the base state and the desired colour. You can also select the industries that you wish to apply the status label to.
## The Partner Connector
The EZYiD Partner connector allows subscribers, mostly inspection services providers or resellers on the platform, to supply products and inspection services digitally. The Connector allows subscribers to invite members to connect and once accepted, subscribers will be able to transfer assets between each other.
1. Log in to EZYiD web app
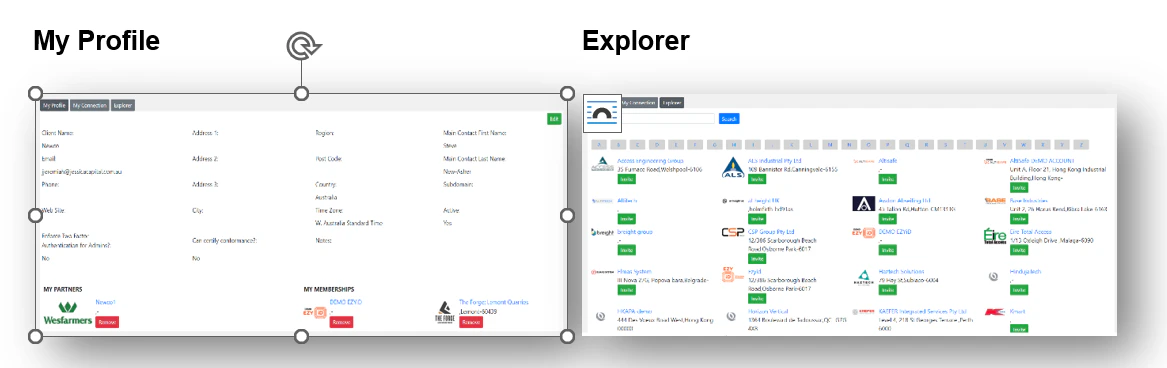
2. Select “**Partner Connector”** from the menu on the RHS and then search for your EZYiD subscriber.
3. In the “**Explorer**” tab enter the name in the text box and click on the “**Search**” button.
4. Once you find your subscriber in the EZYiD Explorer, click on the “**Invite**” button to connect.
5. Click on “**My Connections**” to review the status of invites pending (sent to you) and invites you sent to others.
6. Click on “**My Profile**” to view your partners and memberships.
Click on the “Add New Asset Status” and update the form with the Status label, Code, select the base state and the desired colour. You can also select the industries that you wish to apply the status label to.
## The Partner Connector
The EZYiD Partner connector allows subscribers, mostly inspection services providers or resellers on the platform, to supply products and inspection services digitally. The Connector allows subscribers to invite members to connect and once accepted, subscribers will be able to transfer assets between each other.
1. Log in to EZYiD web app
2. Select “**Partner Connector”** from the menu on the RHS and then search for your EZYiD subscriber.
3. In the “**Explorer**” tab enter the name in the text box and click on the “**Search**” button.
4. Once you find your subscriber in the EZYiD Explorer, click on the “**Invite**” button to connect.
5. Click on “**My Connections**” to review the status of invites pending (sent to you) and invites you sent to others.
6. Click on “**My Profile**” to view your partners and memberships.
 **Accepting Invites**
1. You can either accept or ignore an invite.
2. To accept a connection with a subscriber, click on the “**Accept**” button beside the subscriber.
3. Once accepted, you will become a member of the subscriber’s Partner connections.
4. Members can transfer assets to partners and vice-versa, but cannot provide inspection services.
## Establishing the permissions between you and your customer
1. As an EZYiD Manager, when you create you customer organisation, you are automatically connected with your customer at a partner level, giving you the ability to undertake all supply chain and compliance functions on behalf of your customer.
2. Your customer could opt out of the partner relationship by removing the partner connecting in the “**My Profile**” tab of the “**Partner Connector**” function on the RHS menu.
## Account security
Your teams’ privacy and security of your records are one of our top priorities. Responsible custodianship of your assets which includes the digital record is one of the core values of our company.
In addition to the encryption of your data and frequent backups (daily and 6-minutes), your account can now be secured with two-factor authentication.
**Two-Factor Authentication**
(TFA/2FA) is an extra layer of security that requires not only a valid email address and password, but also an extra system generated code in order to log in. On our platform, you currently have email 2FA authentication only. Future releases will include either by a text sent to your mobile phone or by using a code from an authentication app. The goal of TFA is to make it harder for potential intruders to gain unauthorised access to your account.
To enable 2FA:
1. Open on your user profile in the “People” page; and
2. Enable the checkbox -
**Accepting Invites**
1. You can either accept or ignore an invite.
2. To accept a connection with a subscriber, click on the “**Accept**” button beside the subscriber.
3. Once accepted, you will become a member of the subscriber’s Partner connections.
4. Members can transfer assets to partners and vice-versa, but cannot provide inspection services.
## Establishing the permissions between you and your customer
1. As an EZYiD Manager, when you create you customer organisation, you are automatically connected with your customer at a partner level, giving you the ability to undertake all supply chain and compliance functions on behalf of your customer.
2. Your customer could opt out of the partner relationship by removing the partner connecting in the “**My Profile**” tab of the “**Partner Connector**” function on the RHS menu.
## Account security
Your teams’ privacy and security of your records are one of our top priorities. Responsible custodianship of your assets which includes the digital record is one of the core values of our company.
In addition to the encryption of your data and frequent backups (daily and 6-minutes), your account can now be secured with two-factor authentication.
**Two-Factor Authentication**
(TFA/2FA) is an extra layer of security that requires not only a valid email address and password, but also an extra system generated code in order to log in. On our platform, you currently have email 2FA authentication only. Future releases will include either by a text sent to your mobile phone or by using a code from an authentication app. The goal of TFA is to make it harder for potential intruders to gain unauthorised access to your account.
To enable 2FA:
1. Open on your user profile in the “People” page; and
2. Enable the checkbox -  **Mobile Device Biometrics access**
You can now use your device biometric authentication (finger print or FaceID) to verify your identity and securely access your EZYiD Lite app.
**SAML Single Sign-on (coming soon)**
This service is available to Enterprise Plans only.
Security Assertion Markup Language (SAML) gives users access to EZYiD through an identity provider (IDP) of your choice. It works by transferring the user’s identity from one place (the identity provider) to EZYiD.io
We are currently developing and testing integration with OneLogin as a SAML provider. Future release may include OKTA and [Azure](https://support.monday.com/hc/en-us/articles/360001550260-SAML-Azure) AD.
In addition to having a one-click easy access to your EZYiD applications across all devices, other benefits include automated user provisioning for onboarding and offboarding and onboarding and streamline access control based on role, location and more.
## Custom Field Manager
Create, View and Manage all your Custom Fields in your Workspace in one place.
**What you'll need**
* Custom Field Manager is available on EZYiD Manager Plans only
* EZYiD Essentials and Remote Workers can't use the Custom Field Manager.
* On EZYiD Manager Plans, members can access the Custom Field Manager if the Manage Custom Fields role is enabled for members.
* The Custom Fields tab in the Asset Add and Edit pages will be hidden from all Essential member logins.
* You can link your Custom Fields to the Table view.
**Supported Custom Field types**
| | | |
| ----------- | -------------------------------------------------- | --------------------------------------- |
| **Type** | **Description & Data Validation** | **Example** |
| Checkbox | True or False checkbox | Checkbox Checked with solid fillif true |
| Integer | Formatted numeric value with no decimal places | 1 |
| Decimal | Formatted numeric value with upto 9 decimal places | 1.123456789 |
| String | Enter a single line of plain text. | HS0001 |
| Date | Short date format with no time recorded | 24/10/2024 |
| Date & Time | Custom date and time format | 28/10/2024 15:00 |
**Creating your Custom Fields**
Create your Custom Fields in the System Default page by selecting the Custom Fields Tab.
Click on “Add New Custom Field” to create your custom fields
Enter the Label of the custom field
Select the “Type” of custom field from the dropdown menu. Refer to the supported types above.
Select “Active” to display the Custom Field in the Custom tab of the asset ad and edit screens. To hide a Custom Field, change the status to “Inactive” and the Custom Field(s) will be hidden.
**Display and Update Custom Field data**
Add your Custom Fields to the Table columns to update the data cells. You can either enter the data in each custom fields, auto fill or paste the data into the cells
**NOTE:** Custom fields are currently not visible in the tableview for selection or editing.
**Mobile Device Biometrics access**
You can now use your device biometric authentication (finger print or FaceID) to verify your identity and securely access your EZYiD Lite app.
**SAML Single Sign-on (coming soon)**
This service is available to Enterprise Plans only.
Security Assertion Markup Language (SAML) gives users access to EZYiD through an identity provider (IDP) of your choice. It works by transferring the user’s identity from one place (the identity provider) to EZYiD.io
We are currently developing and testing integration with OneLogin as a SAML provider. Future release may include OKTA and [Azure](https://support.monday.com/hc/en-us/articles/360001550260-SAML-Azure) AD.
In addition to having a one-click easy access to your EZYiD applications across all devices, other benefits include automated user provisioning for onboarding and offboarding and onboarding and streamline access control based on role, location and more.
## Custom Field Manager
Create, View and Manage all your Custom Fields in your Workspace in one place.
**What you'll need**
* Custom Field Manager is available on EZYiD Manager Plans only
* EZYiD Essentials and Remote Workers can't use the Custom Field Manager.
* On EZYiD Manager Plans, members can access the Custom Field Manager if the Manage Custom Fields role is enabled for members.
* The Custom Fields tab in the Asset Add and Edit pages will be hidden from all Essential member logins.
* You can link your Custom Fields to the Table view.
**Supported Custom Field types**
| | | |
| ----------- | -------------------------------------------------- | --------------------------------------- |
| **Type** | **Description & Data Validation** | **Example** |
| Checkbox | True or False checkbox | Checkbox Checked with solid fillif true |
| Integer | Formatted numeric value with no decimal places | 1 |
| Decimal | Formatted numeric value with upto 9 decimal places | 1.123456789 |
| String | Enter a single line of plain text. | HS0001 |
| Date | Short date format with no time recorded | 24/10/2024 |
| Date & Time | Custom date and time format | 28/10/2024 15:00 |
**Creating your Custom Fields**
Create your Custom Fields in the System Default page by selecting the Custom Fields Tab.
Click on “Add New Custom Field” to create your custom fields
Enter the Label of the custom field
Select the “Type” of custom field from the dropdown menu. Refer to the supported types above.
Select “Active” to display the Custom Field in the Custom tab of the asset ad and edit screens. To hide a Custom Field, change the status to “Inactive” and the Custom Field(s) will be hidden.
**Display and Update Custom Field data**
Add your Custom Fields to the Table columns to update the data cells. You can either enter the data in each custom fields, auto fill or paste the data into the cells
**NOTE:** Custom fields are currently not visible in the tableview for selection or editing.